How to install Fontana Peru Commercial Motion Sensor Activated Automatic Faucet Brass Valve Gold Finish | FS-6431
| Easy step by steps installation instructions for Commercial Motion Sensor Activated Automatic Faucet Brass Valve Gold Tone Finish
|
|
Visit Product Page 
|
|
- Before you begin, please read the installation instructions below. Observe all local building and safety codes.
- Unpack and inspect the products for any shipping damages. If you find damages, do not install.
- Please note all products must be installed by a professional and certified plumber otherwise warranty might be voided.
|
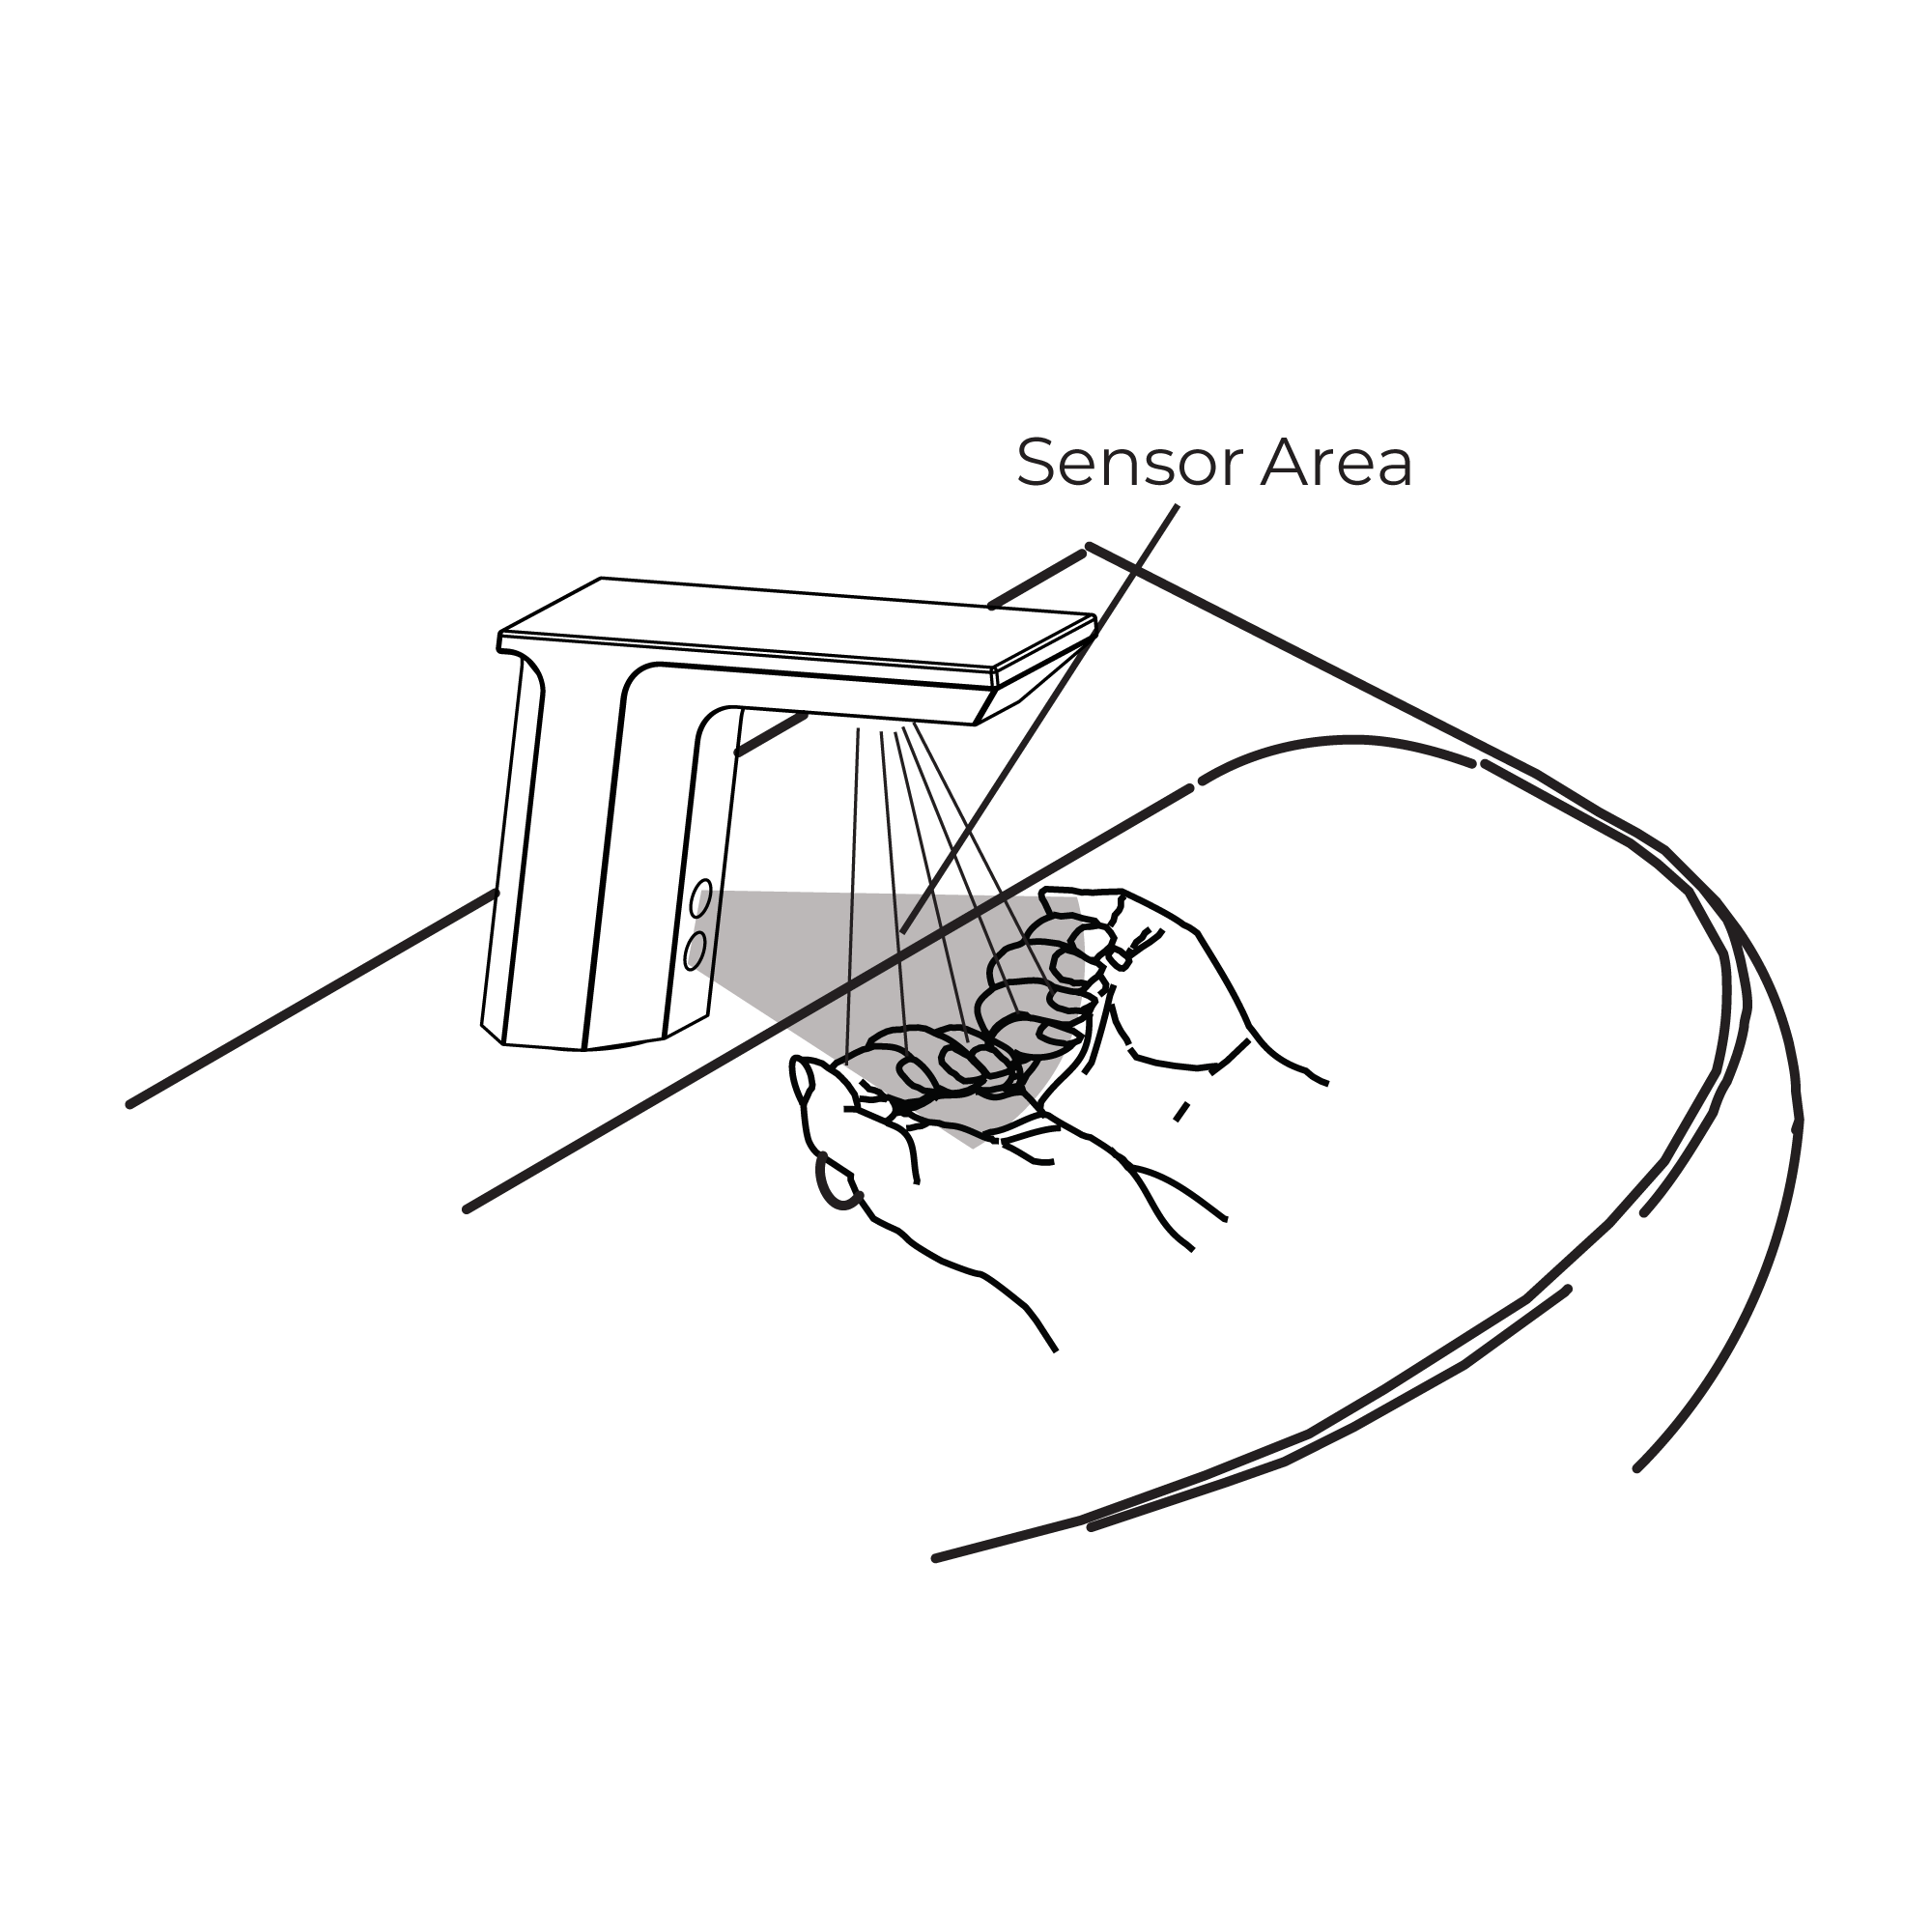
sensor
|
|
|
Sensor Faucet Installations Instructions| Step 1: | faucet | Step 2: | 
| | 
|
| | |
 | Step 3: | | Step 4: | 
| sensor | 
|
| |
| | Step 5: | | Step 6: | 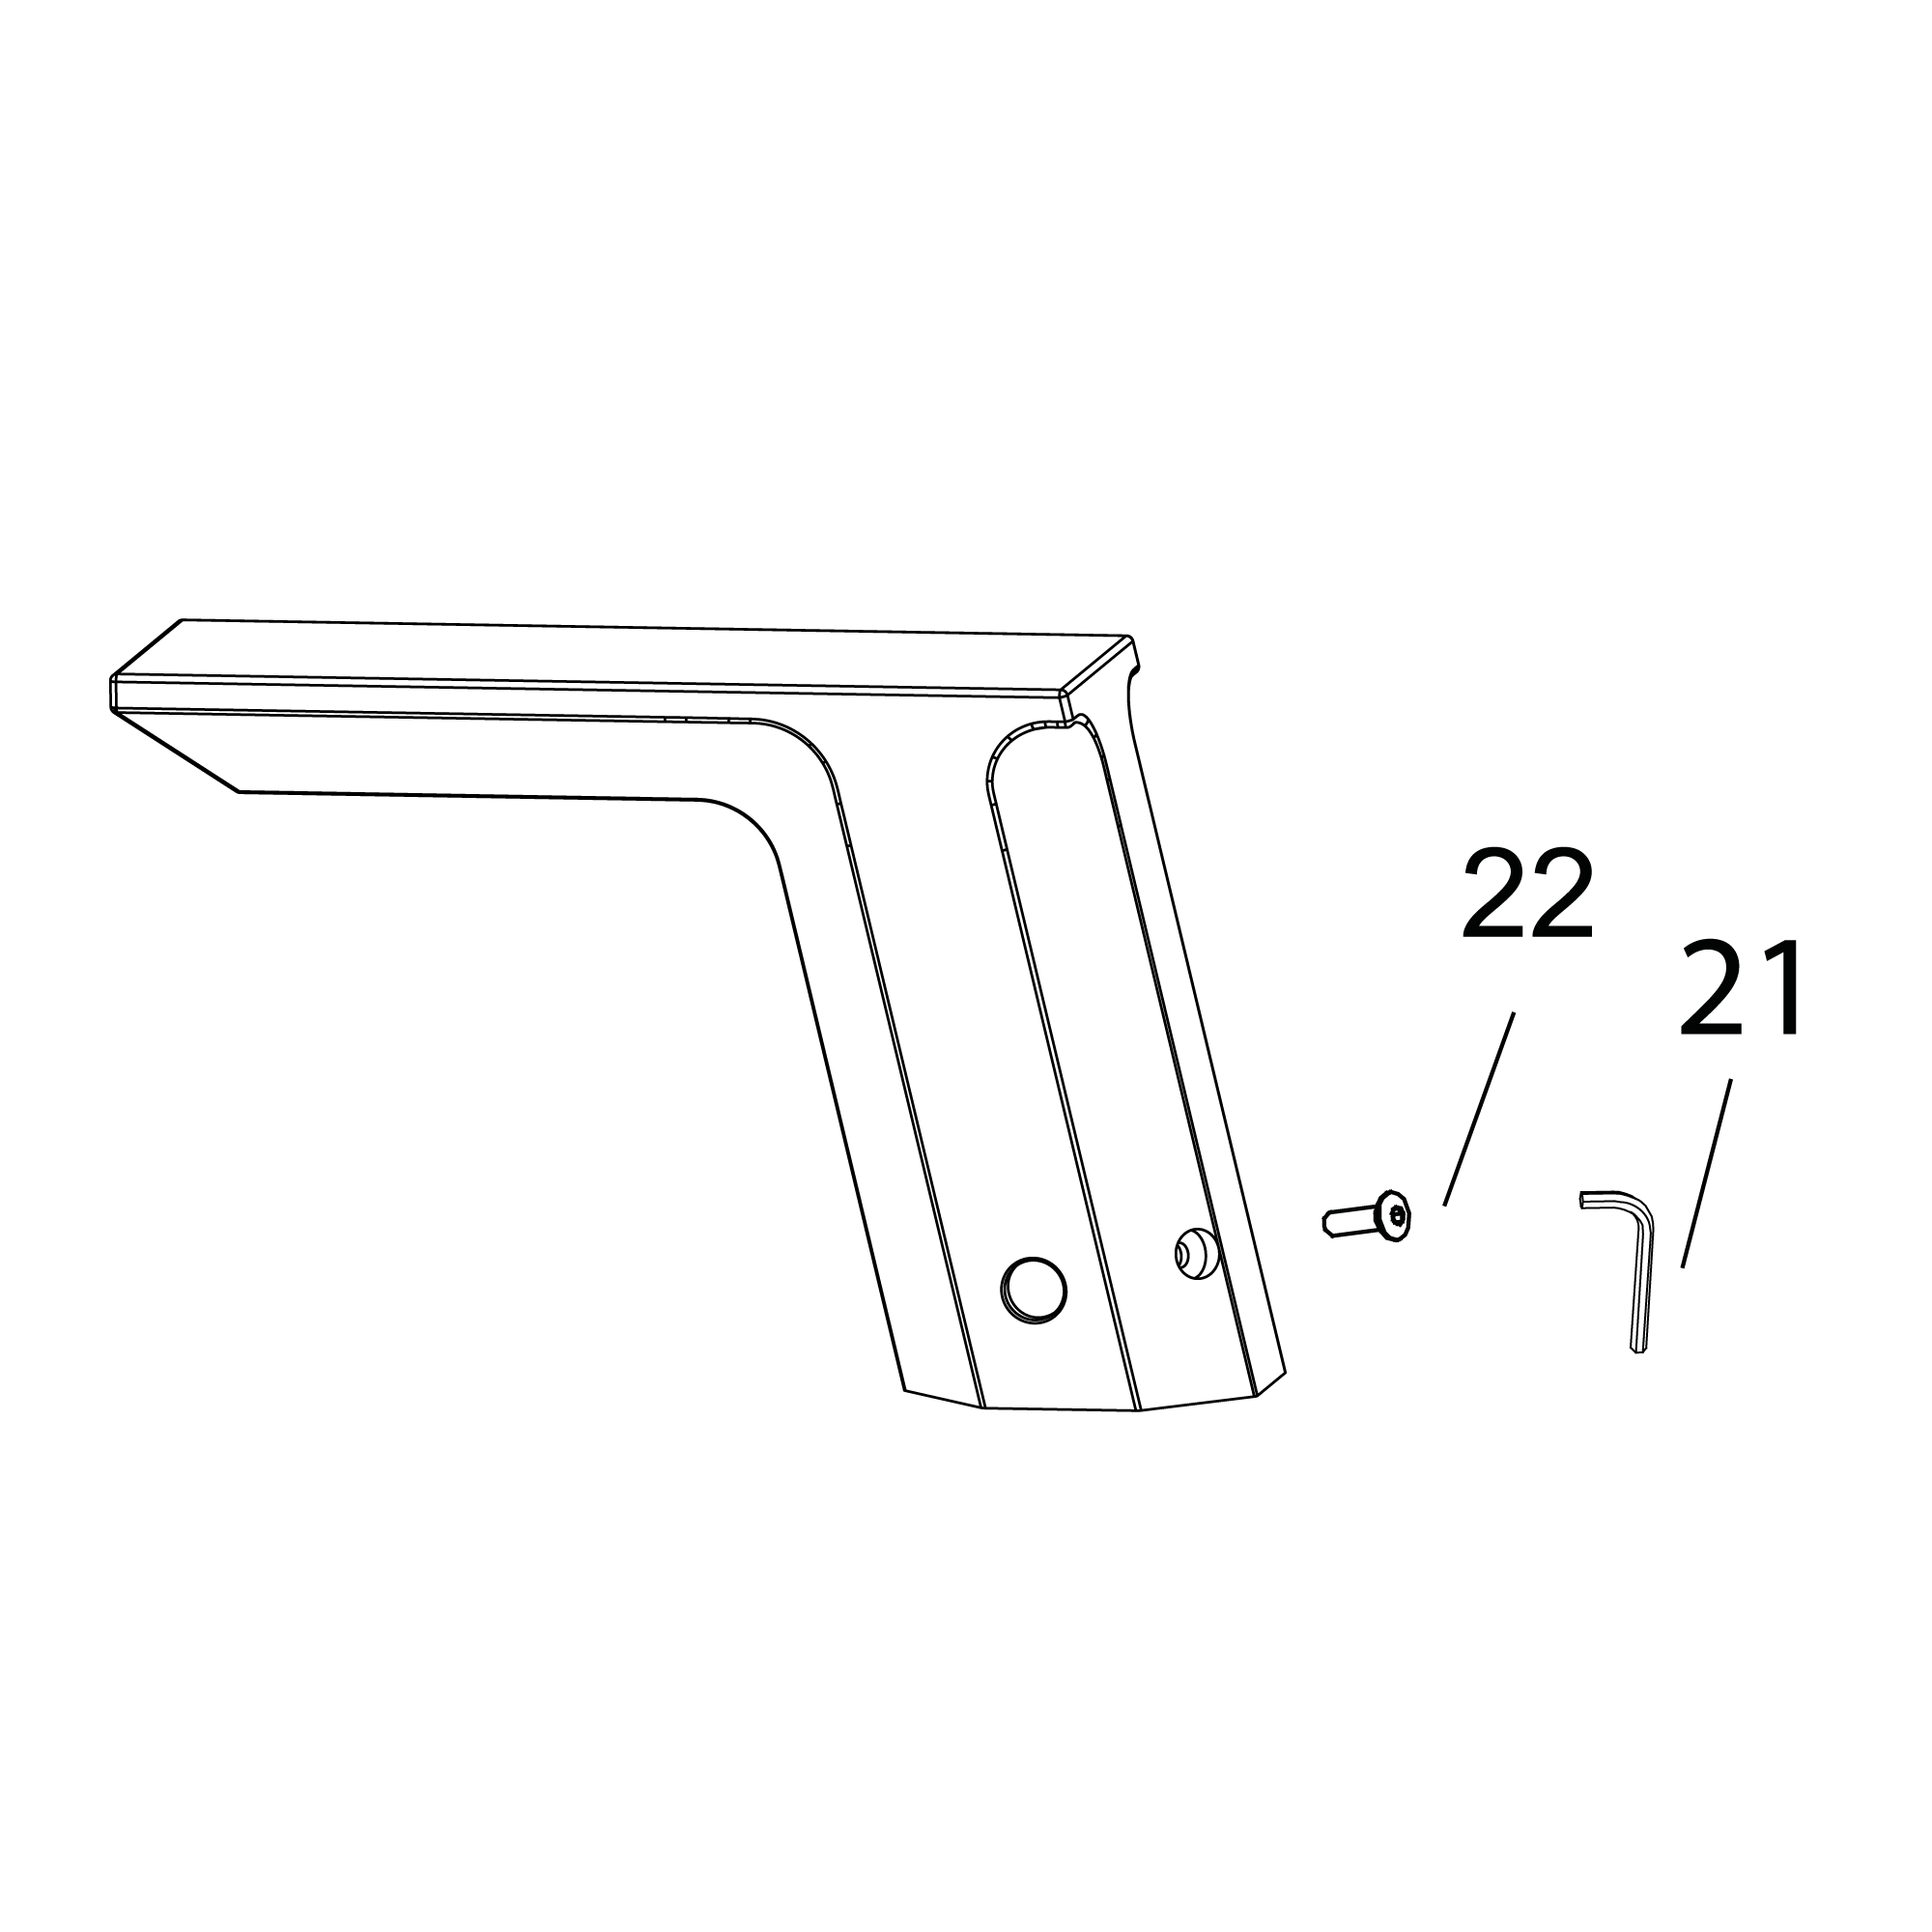
| | 
|
| |
| | Step 7: | | Step 8: | 
| | 
|
| |
| | Step 9: | | Step 10: | 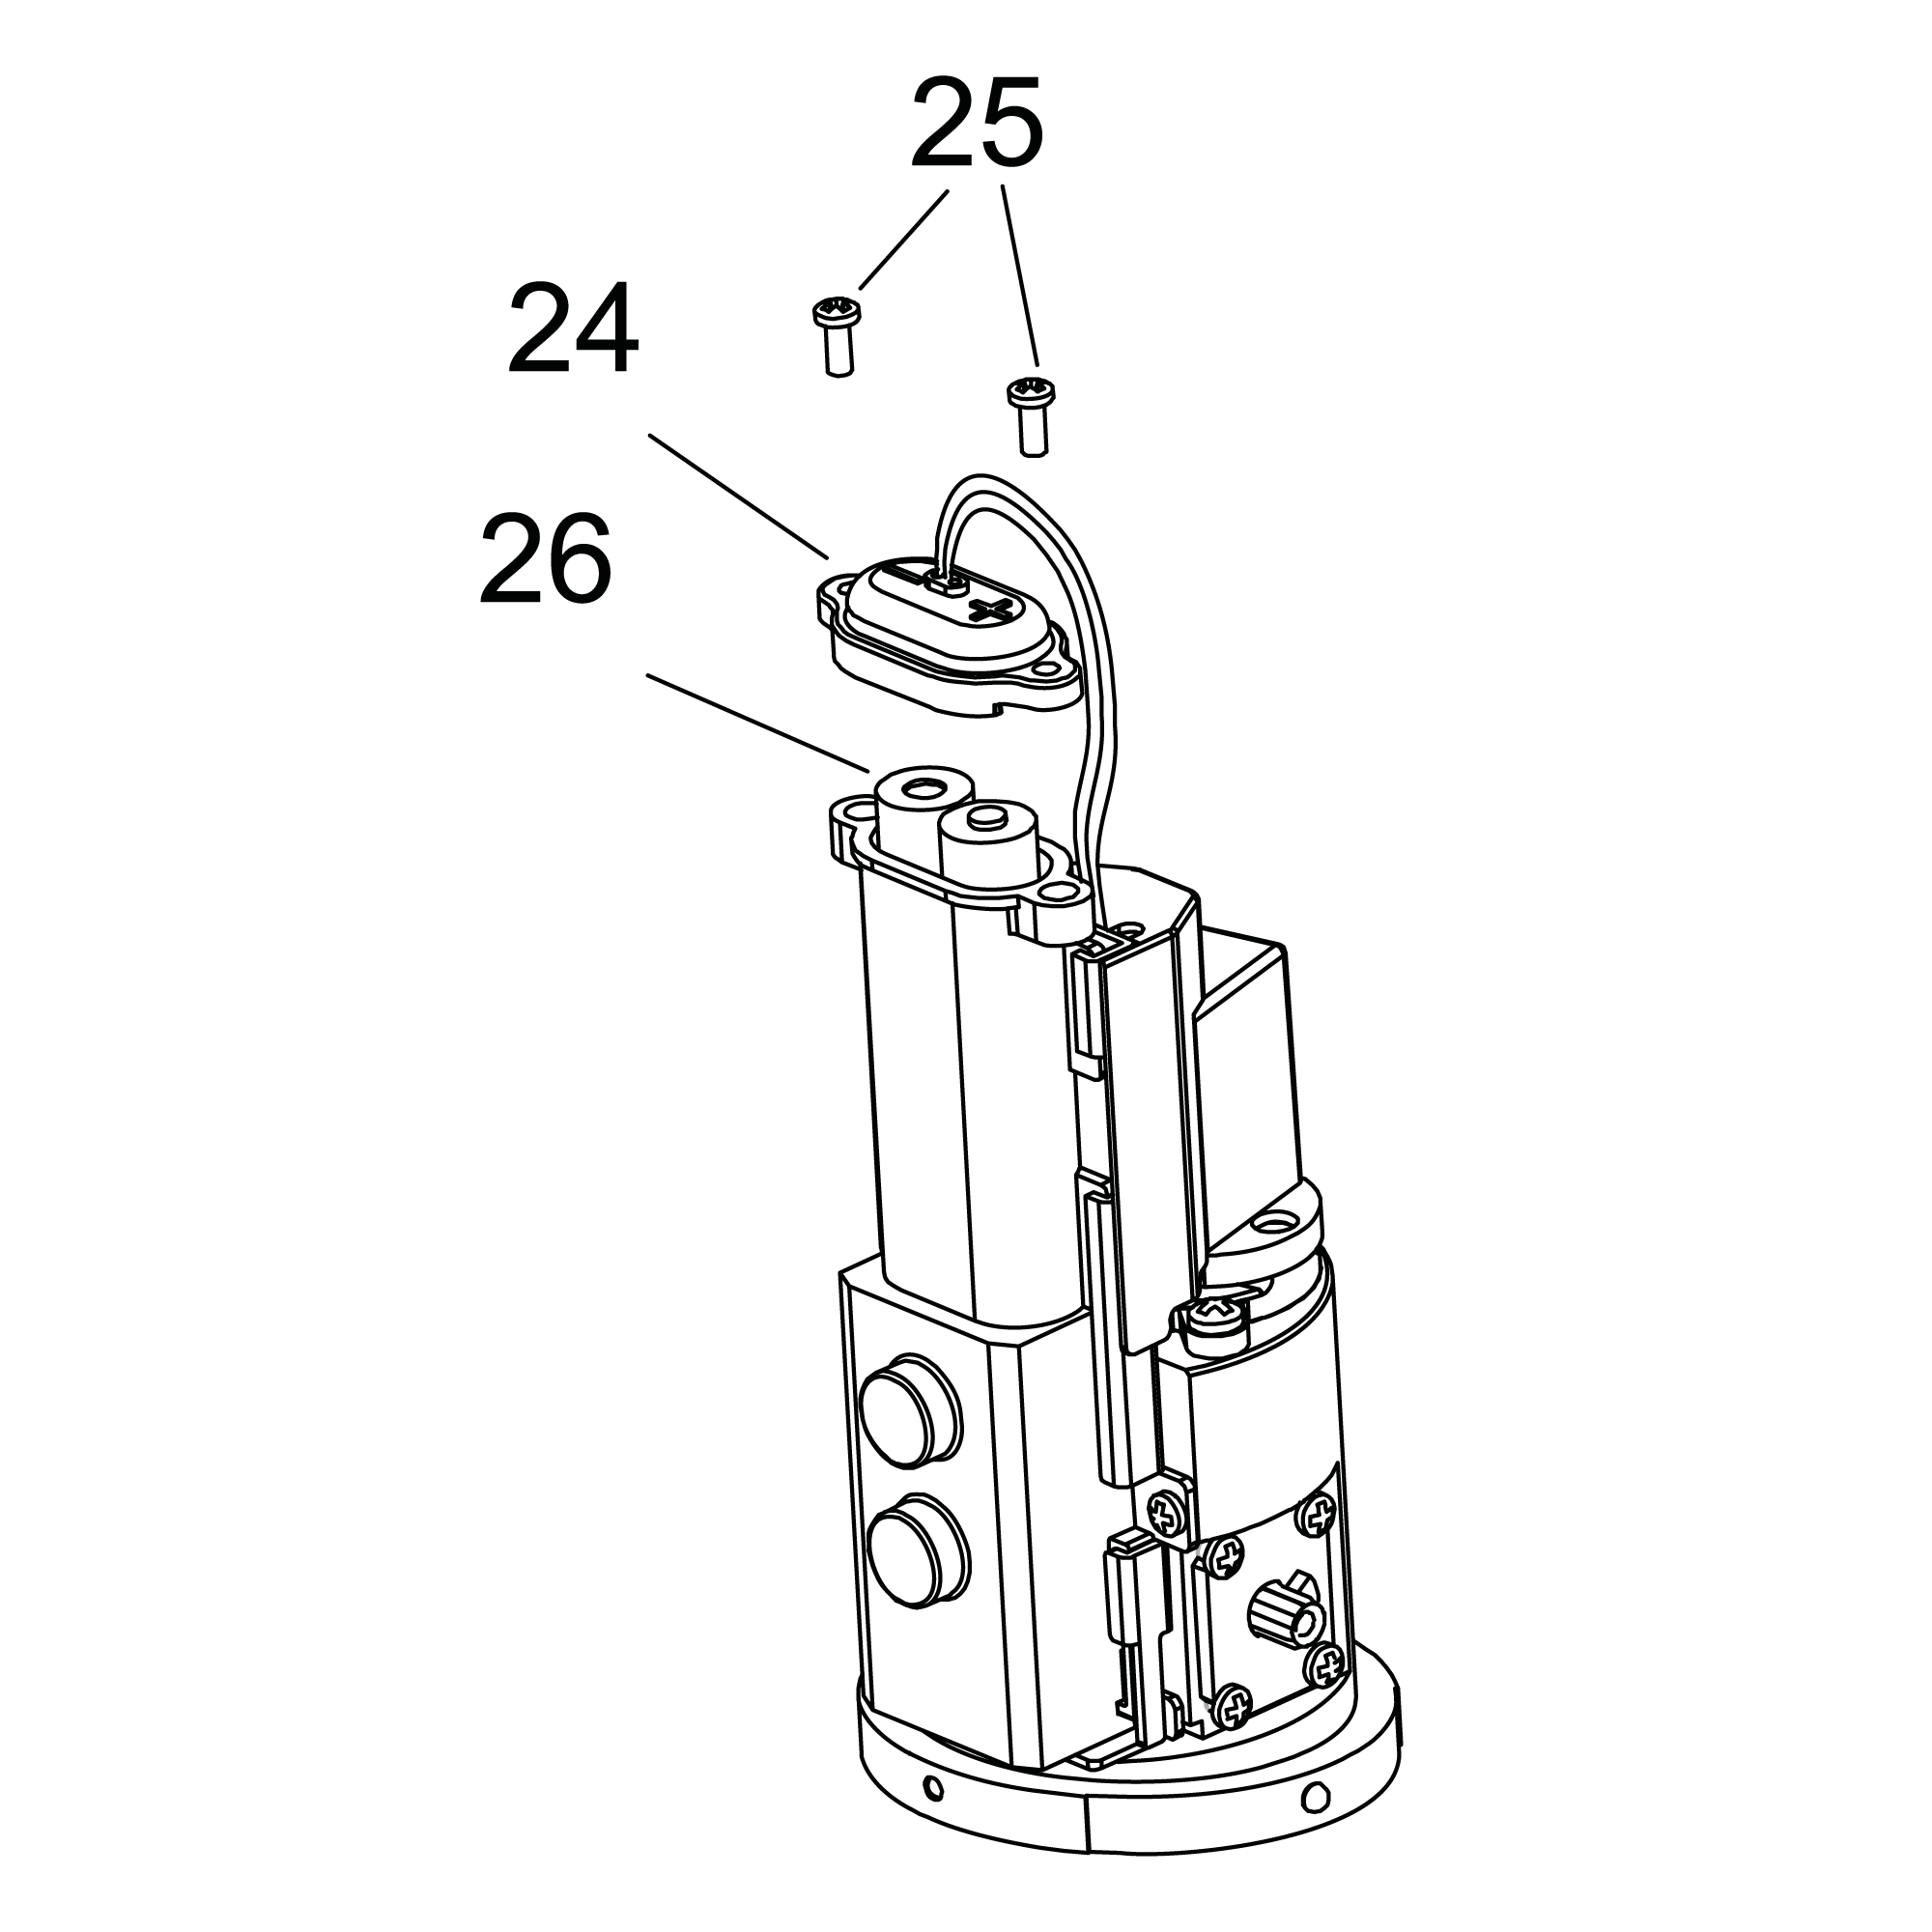
| | 
|
| |
|
| | |
Operation Instructions:
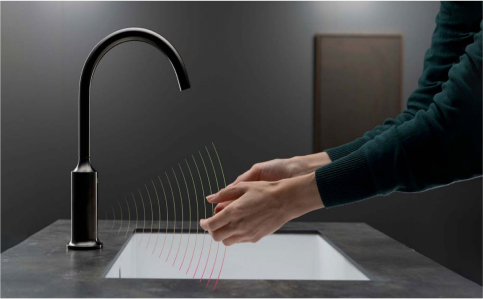
1. Put your hand in the sensing range, the faucet should turn on. The faucet should turn off after removal within 0.5~2 seconds. The sensing distance will be adjusted automatically as per the condition of the lavatory and the surrounding environment.
2. Facing the faucet, when rotating the handle to the front, the temperature of outlet water gets lower. When rotating the handle back, the temperature of the outlet water gets higher.
Senser Duration: Less than 0.75s
Shut-off Delay: 0.5~2s
Sensing Distance: Automatic adjustment from 20cm to 30 cm. The actual sensor distance will be slightly variable on different lavatories.
Flow Rate: No more than 0.15L/s at 0.1MPa.
Overtime Flowing Control: Automatically stop flushing when the faucet senses an object for more than 1 minute continuously
Ambient Temperature: 1~55℃
Supply Water Temperature: 0.5~71℃
Supply Water Pressure: 0.05~0.86MPa
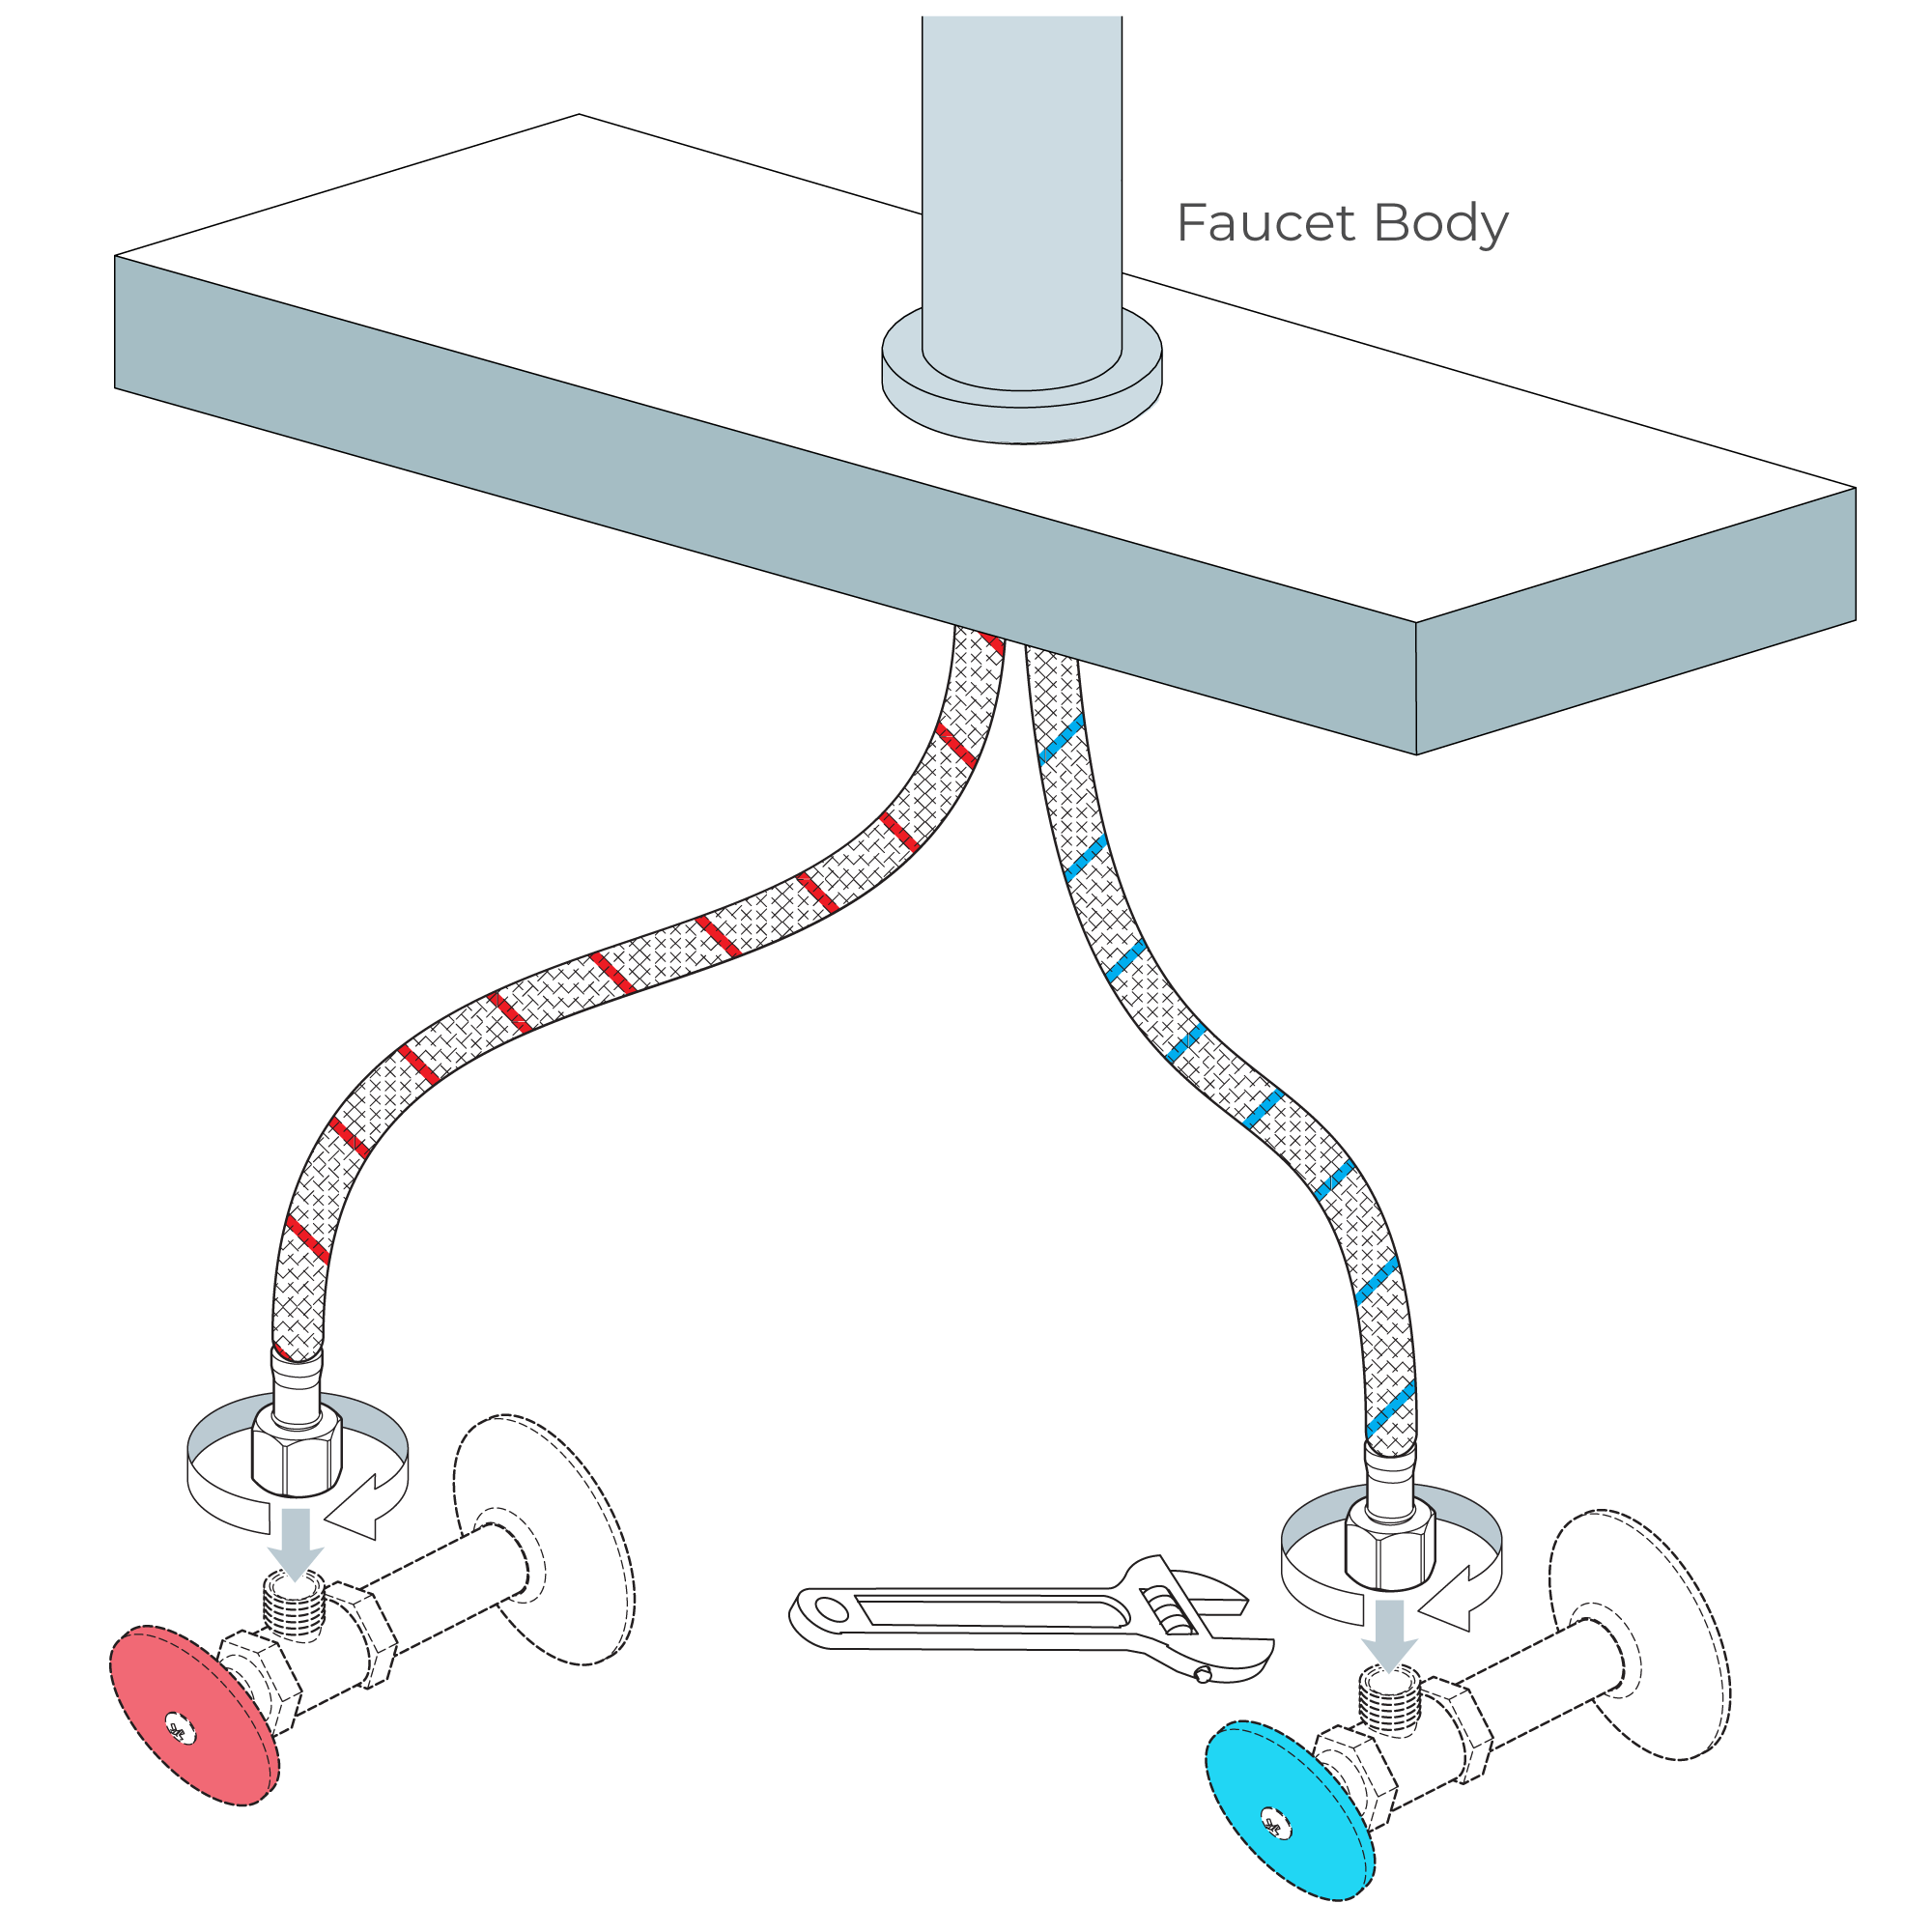
How to Install the Faucet
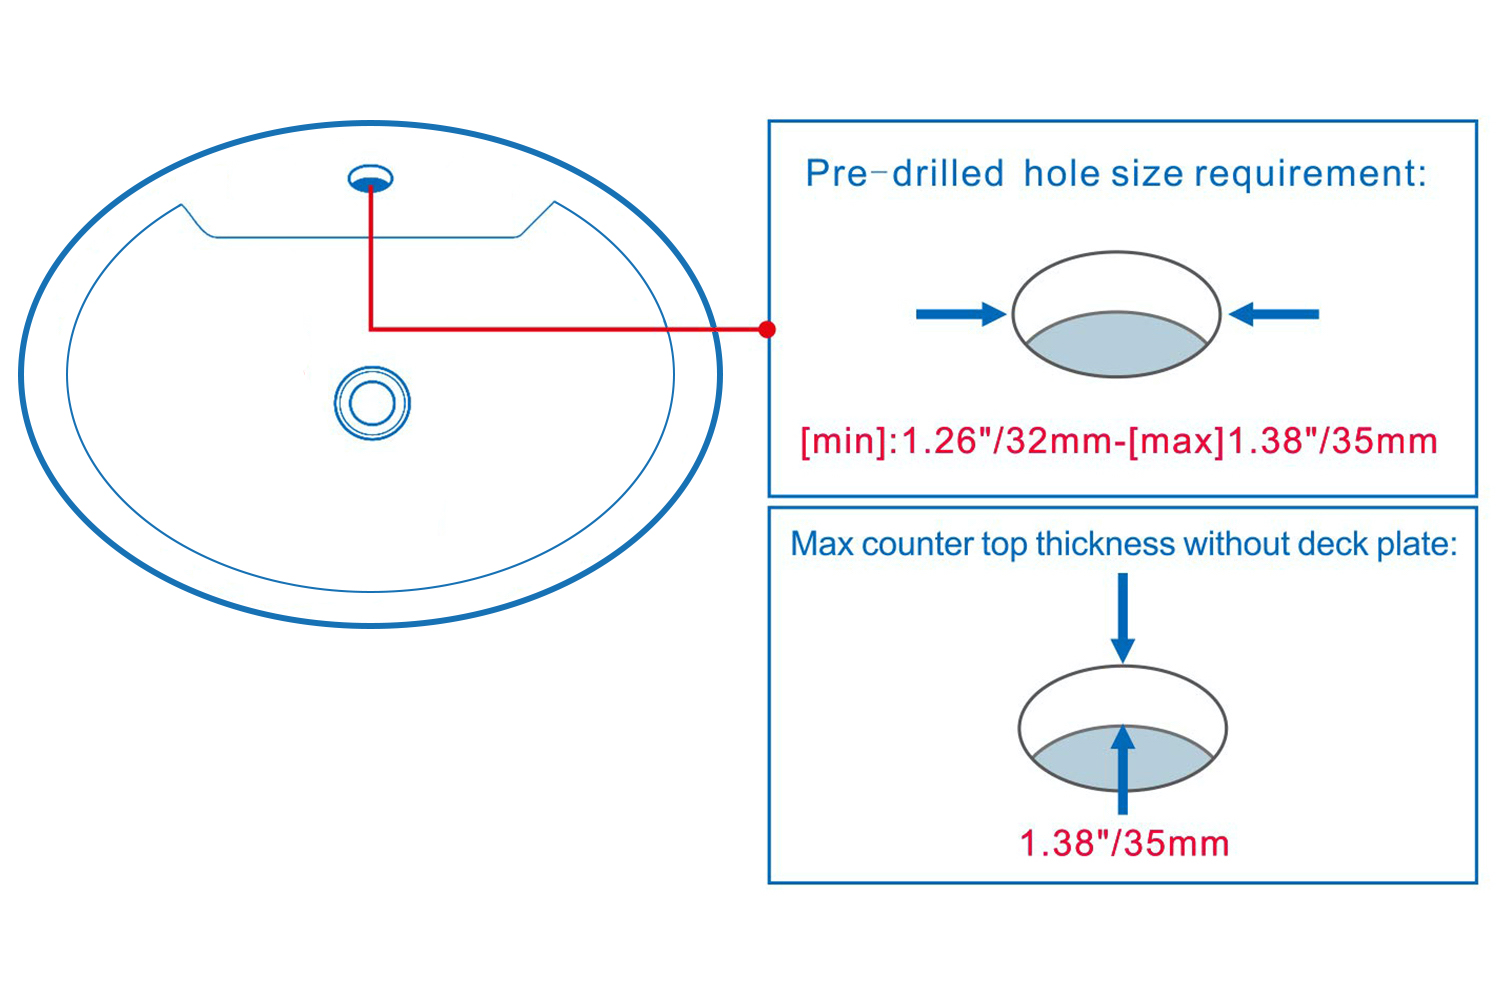
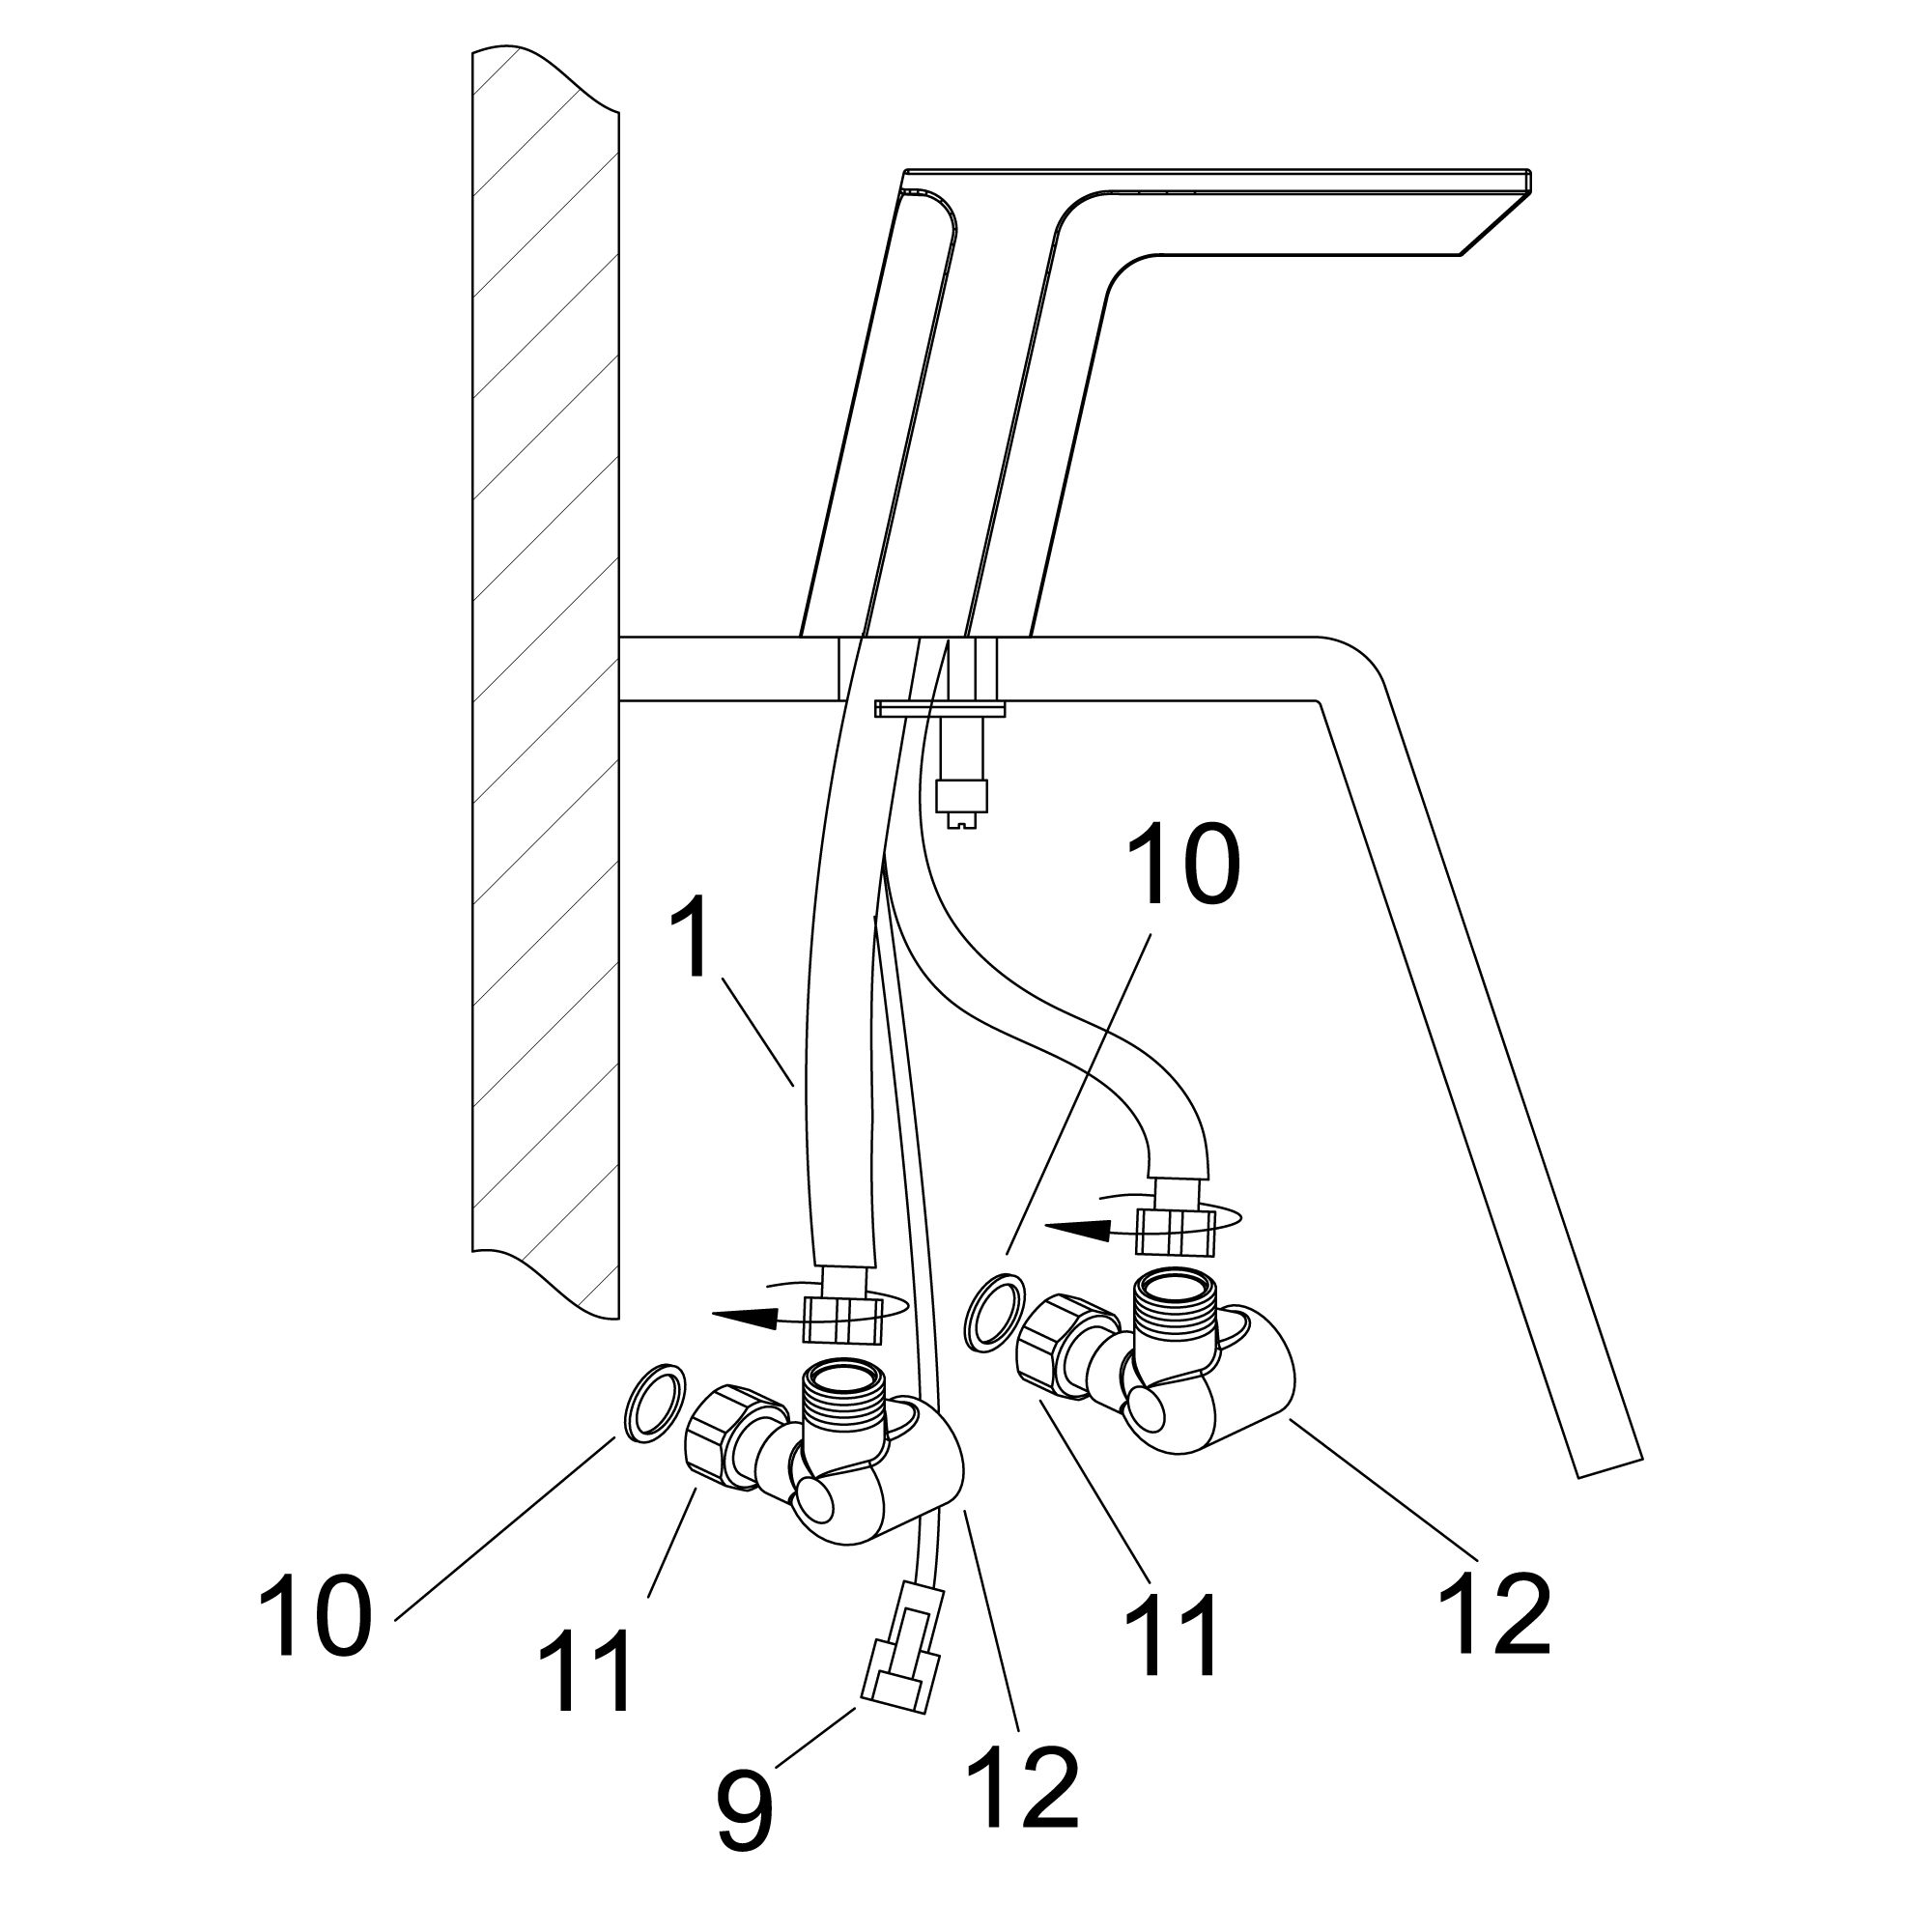
1. Fixing the faucet and lavatory Screw off the flexible supply hoses (1) from the faucet. Firstly, install the mounting stud (2) to the bottom of the faucet (3), then slip the washer (4) over the mounting stud, and put it into the groove on the body assembly. Then put wire (9) (used with AC-Faucet) through the basinhole(5). Insert the flexible supply hoses (1) into the hole (5). from underside of the lavatory and tightenthem into the faucet holes by hand. From underside of the lavatory, slide the rubber washer (6), metal washer (7) and fixed nut (8) onto the mounting stud (2). Position faucet wire (9) and hoses, tighten nut (8) with a wrench to secure the faucet to the lavatory.
2. Fixing the connector assy Put the washer (10) in the inlet nuts(11) of connector assemblies (12). Keep the outlets upwards. Tighten the inlet nuts (11) to the water supply pipe with a wrench. Connect the flexible supply hoses (1) and the connector assemblies (12) and tighten them. When facing the faucet, the left hose is hot water, and the right hose is cold water.
Note: For cold only faucet, install the flexible supply hose on the right side only.
| |  |
How to Install & Replace Batteries
Please remove the objects from the sensing distance and lavatory. Objects in this range will shorten the sensing distance.
1. For temperature adjustment faucet, after installing the faucet on the lavatory, loose the screw (20) on the temp adjustment handle counterclockwise with the hex wrench (21). Remove the screw (20), the spring washer (19) and the temp adjustment handle (18). For cold only and temperature constant faucet, do the next step directly.
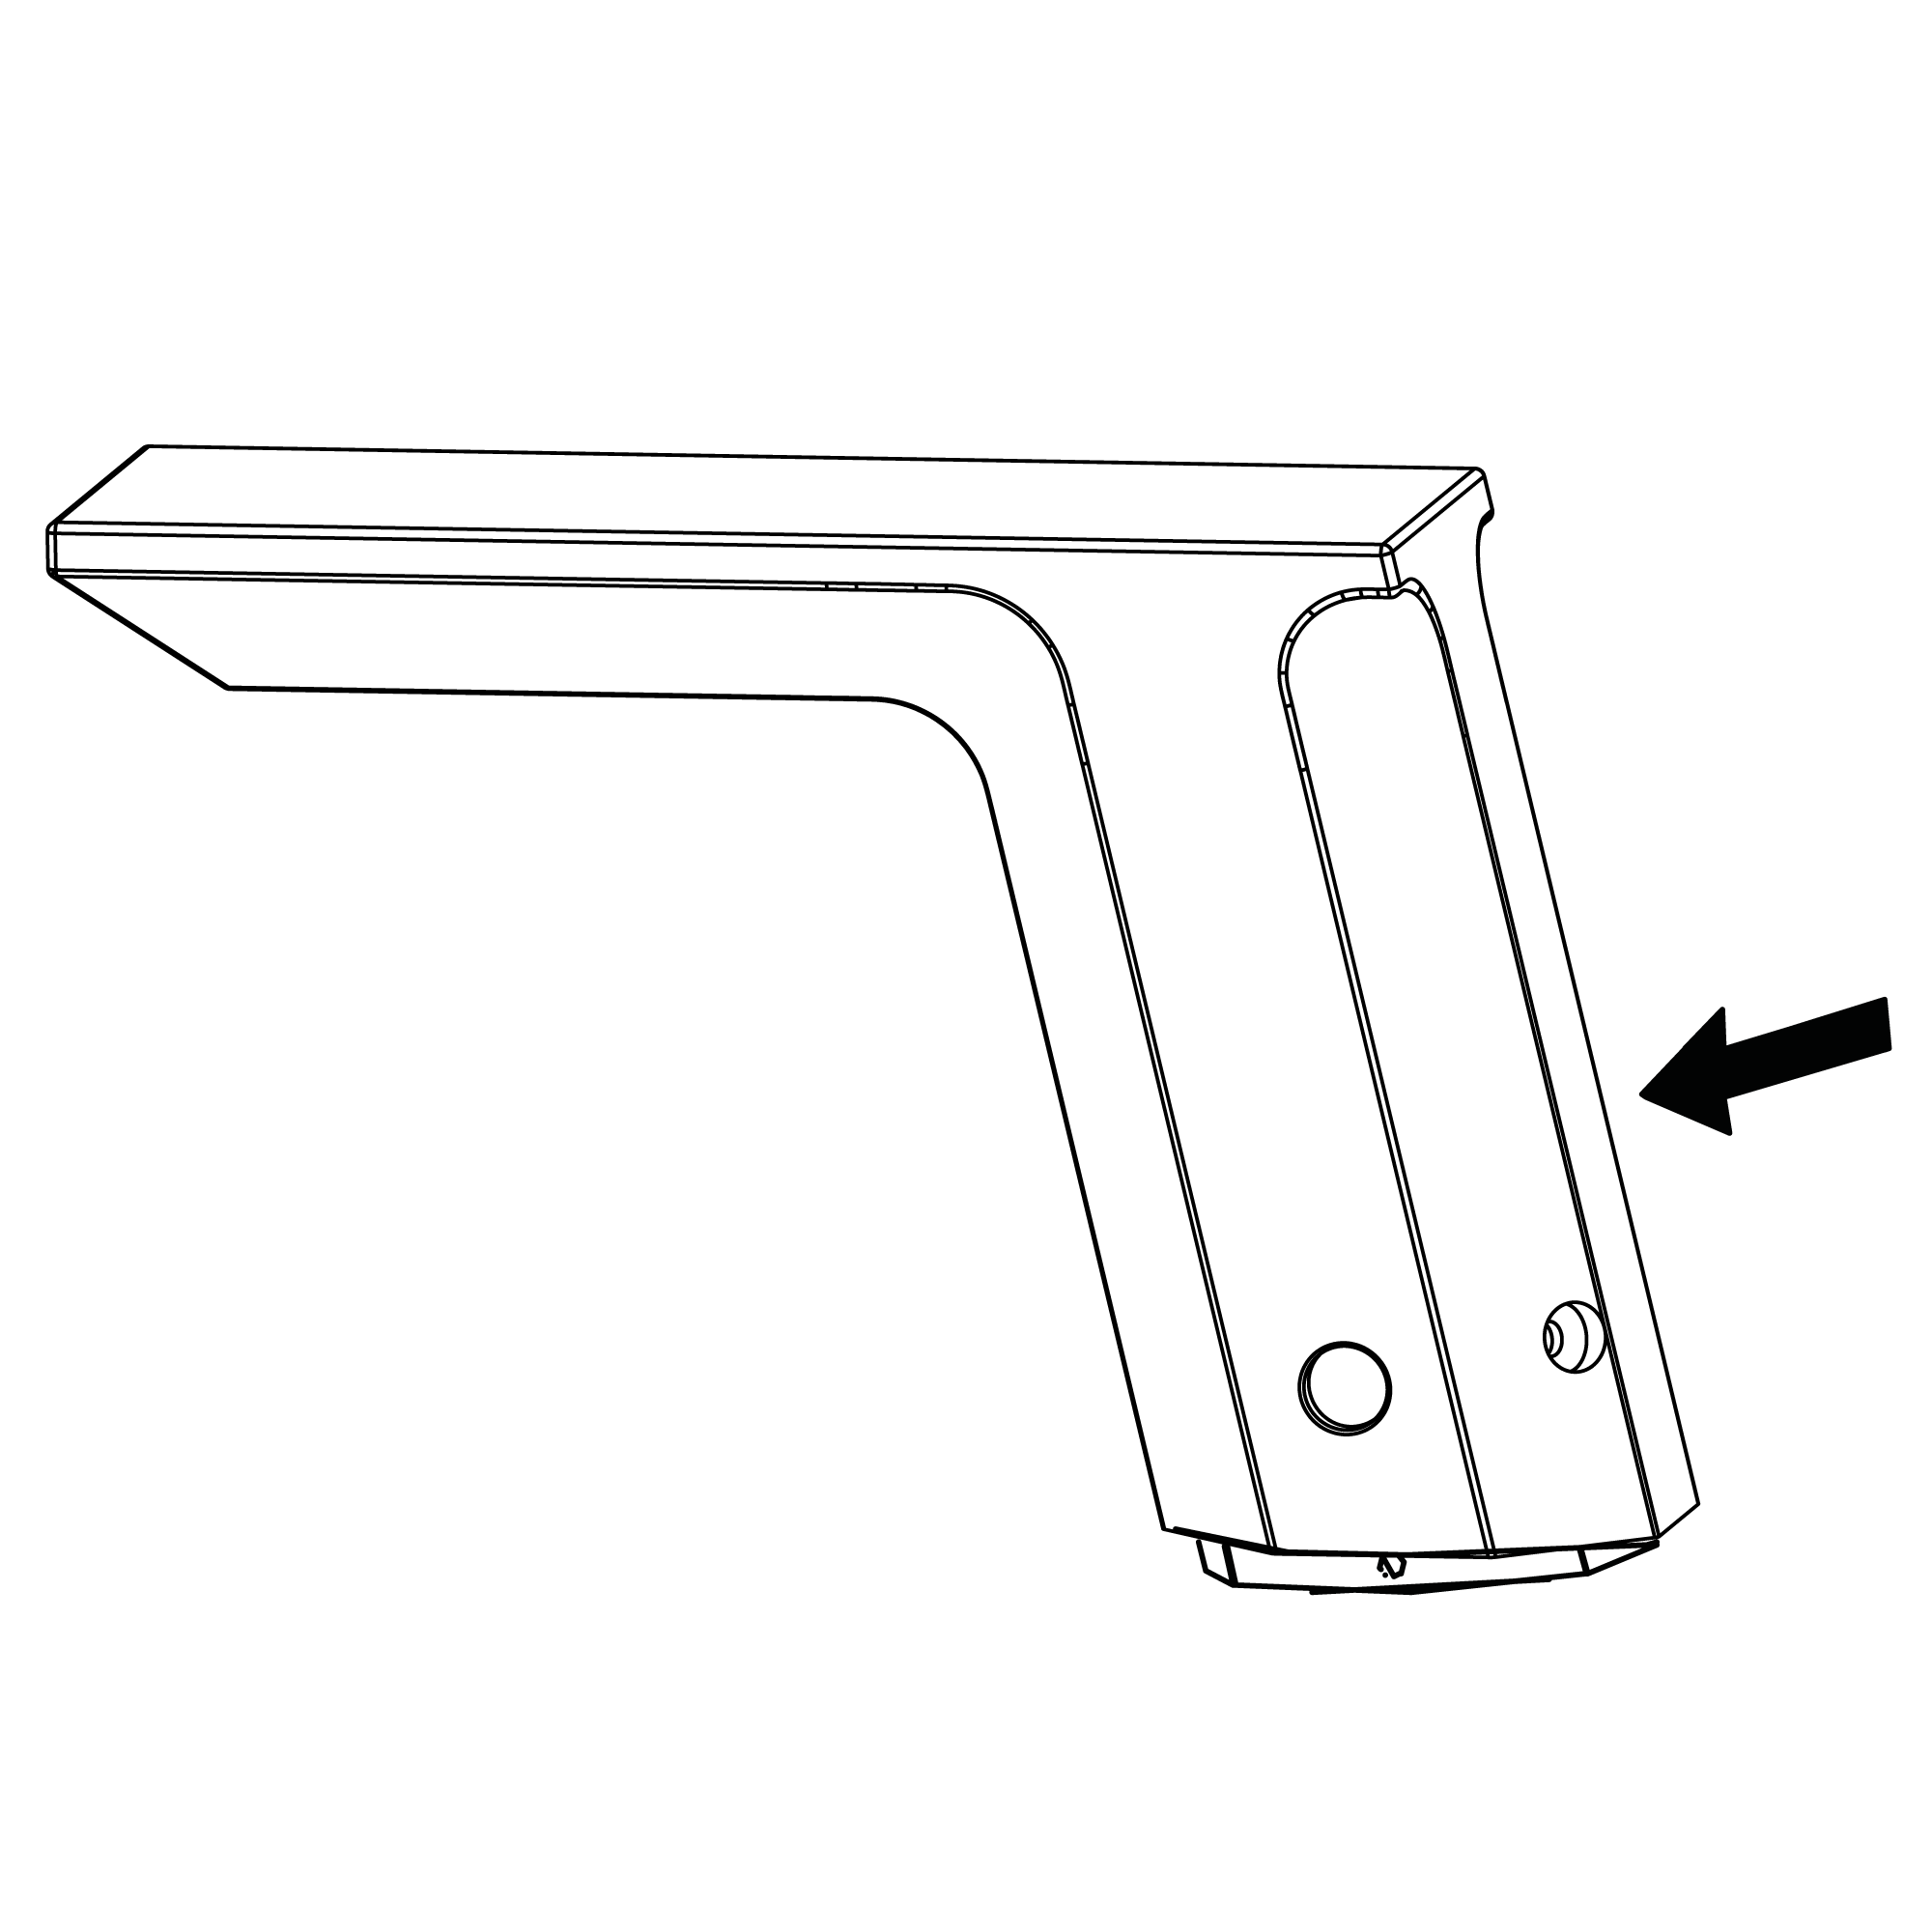
2. Loose counterclockwise and remove the screw (22) on the back of the faucet with the hex wrench (21).
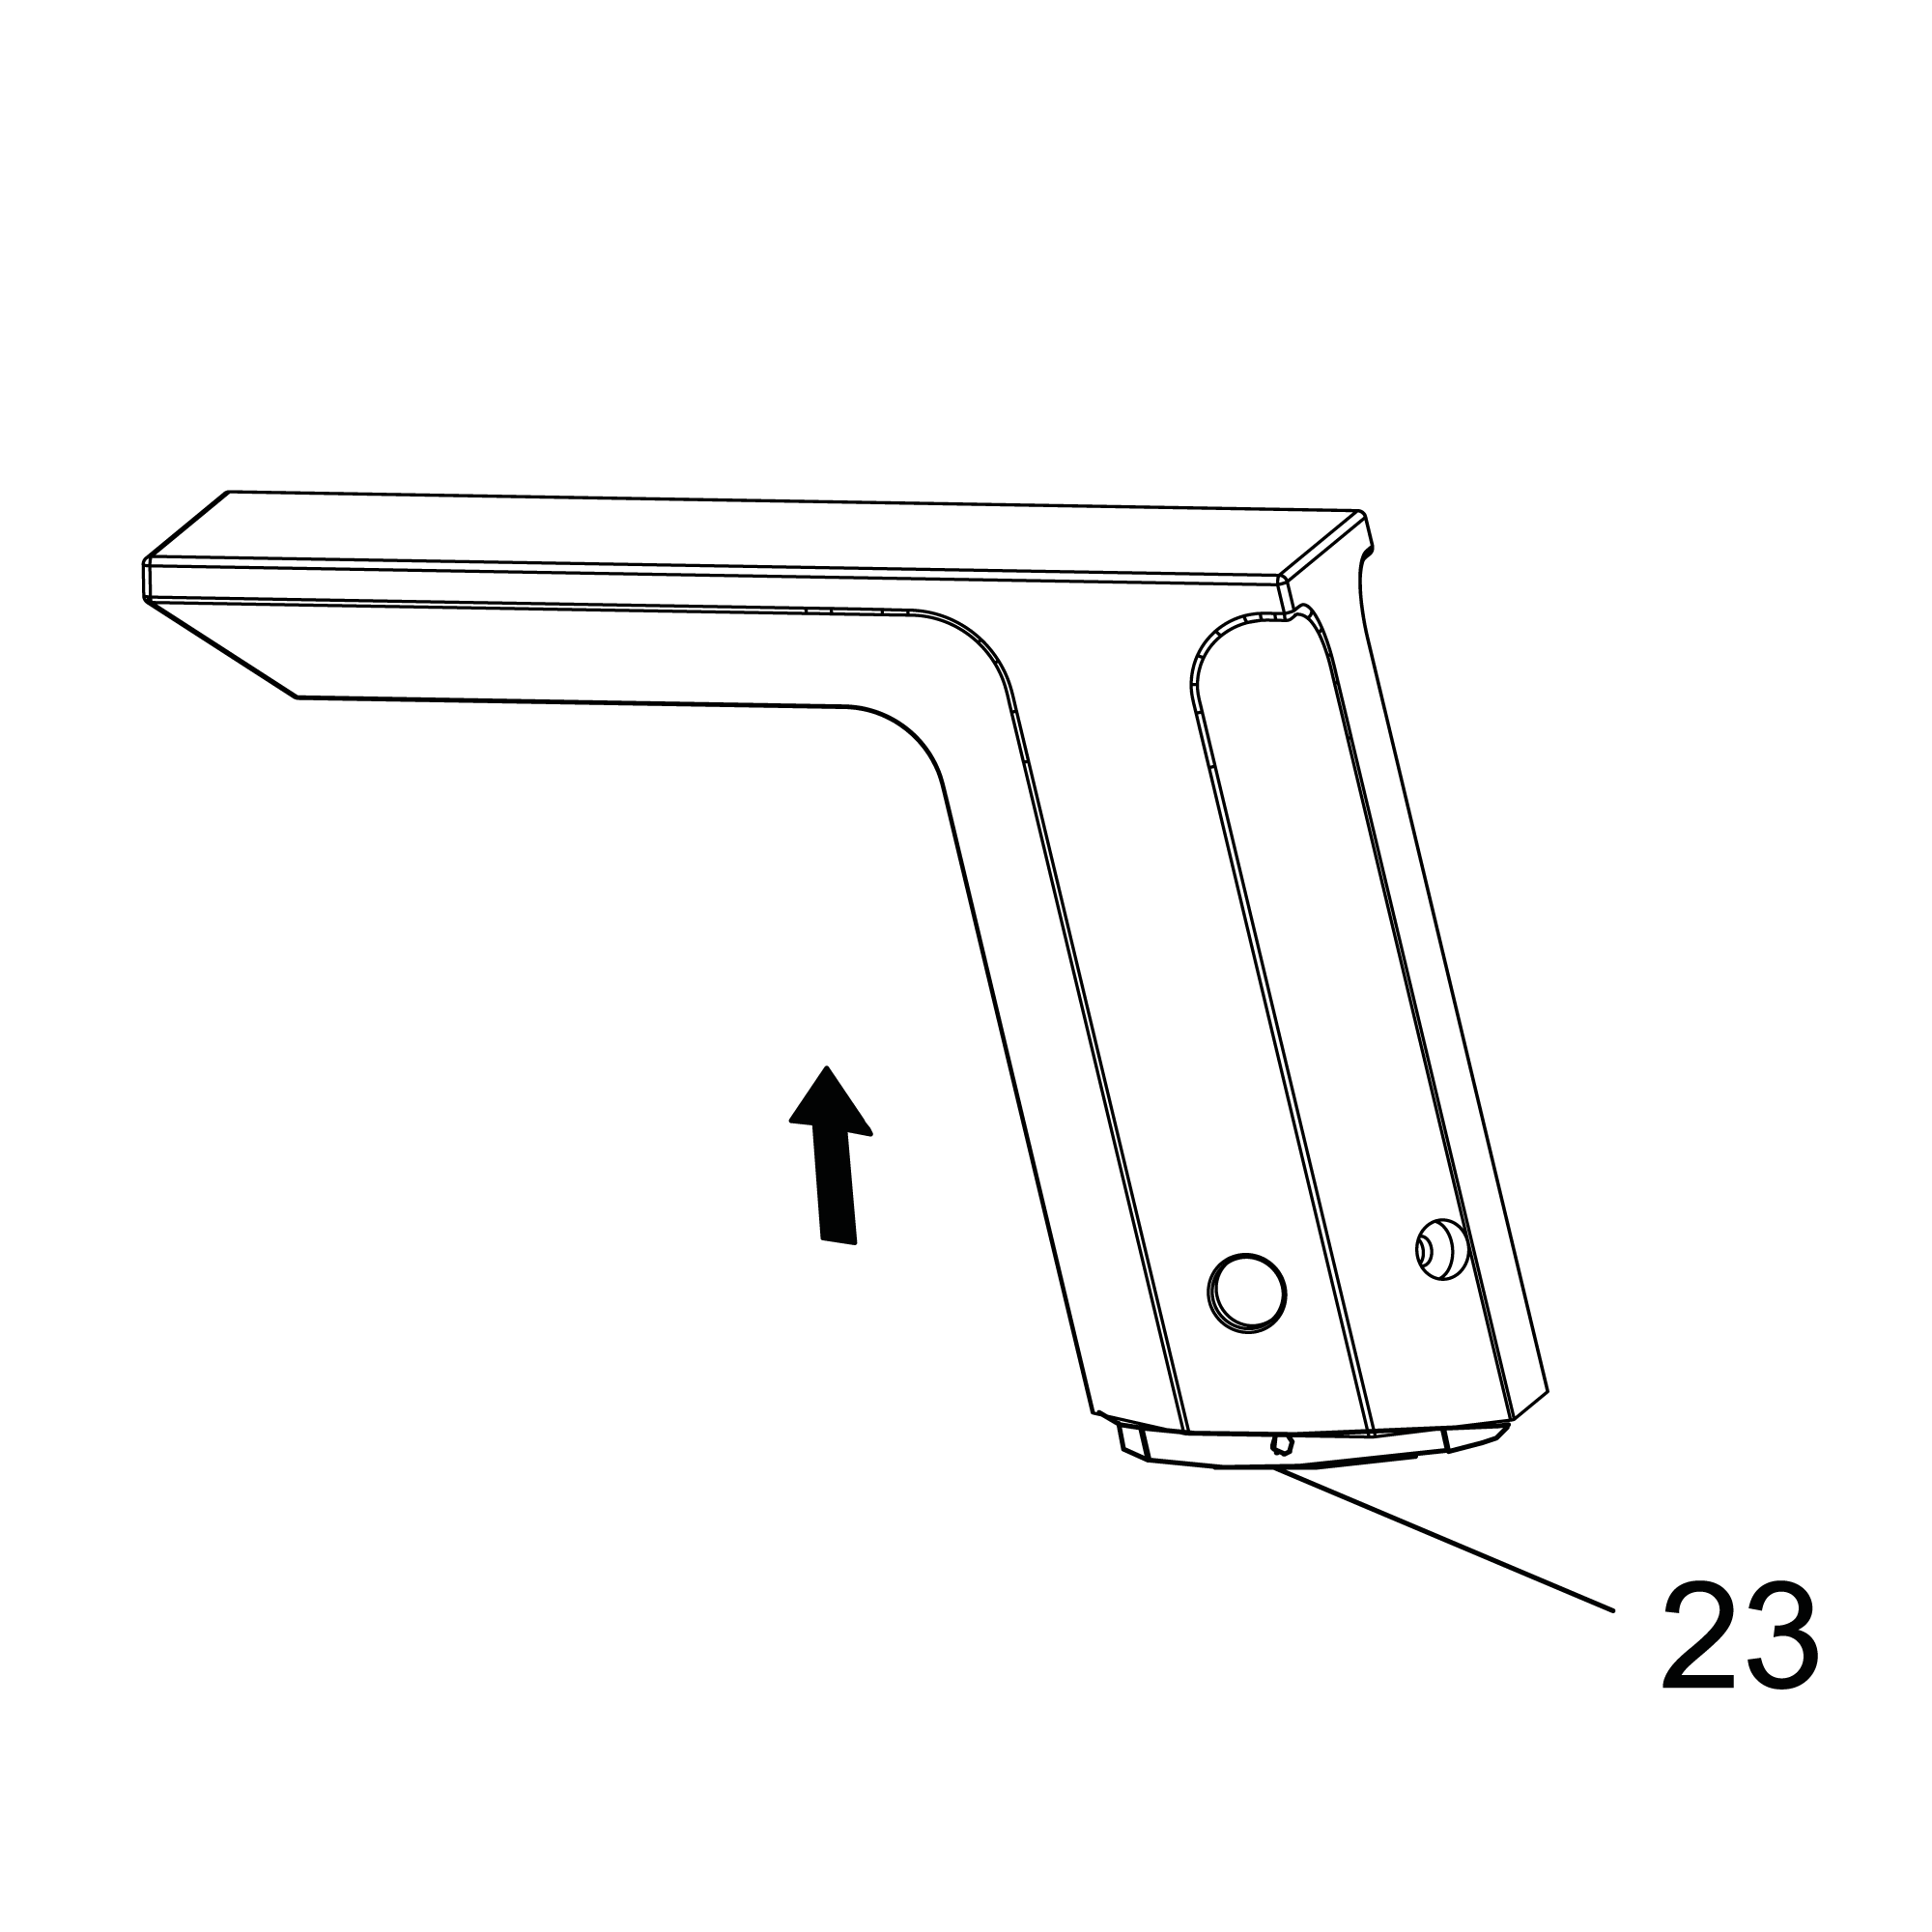
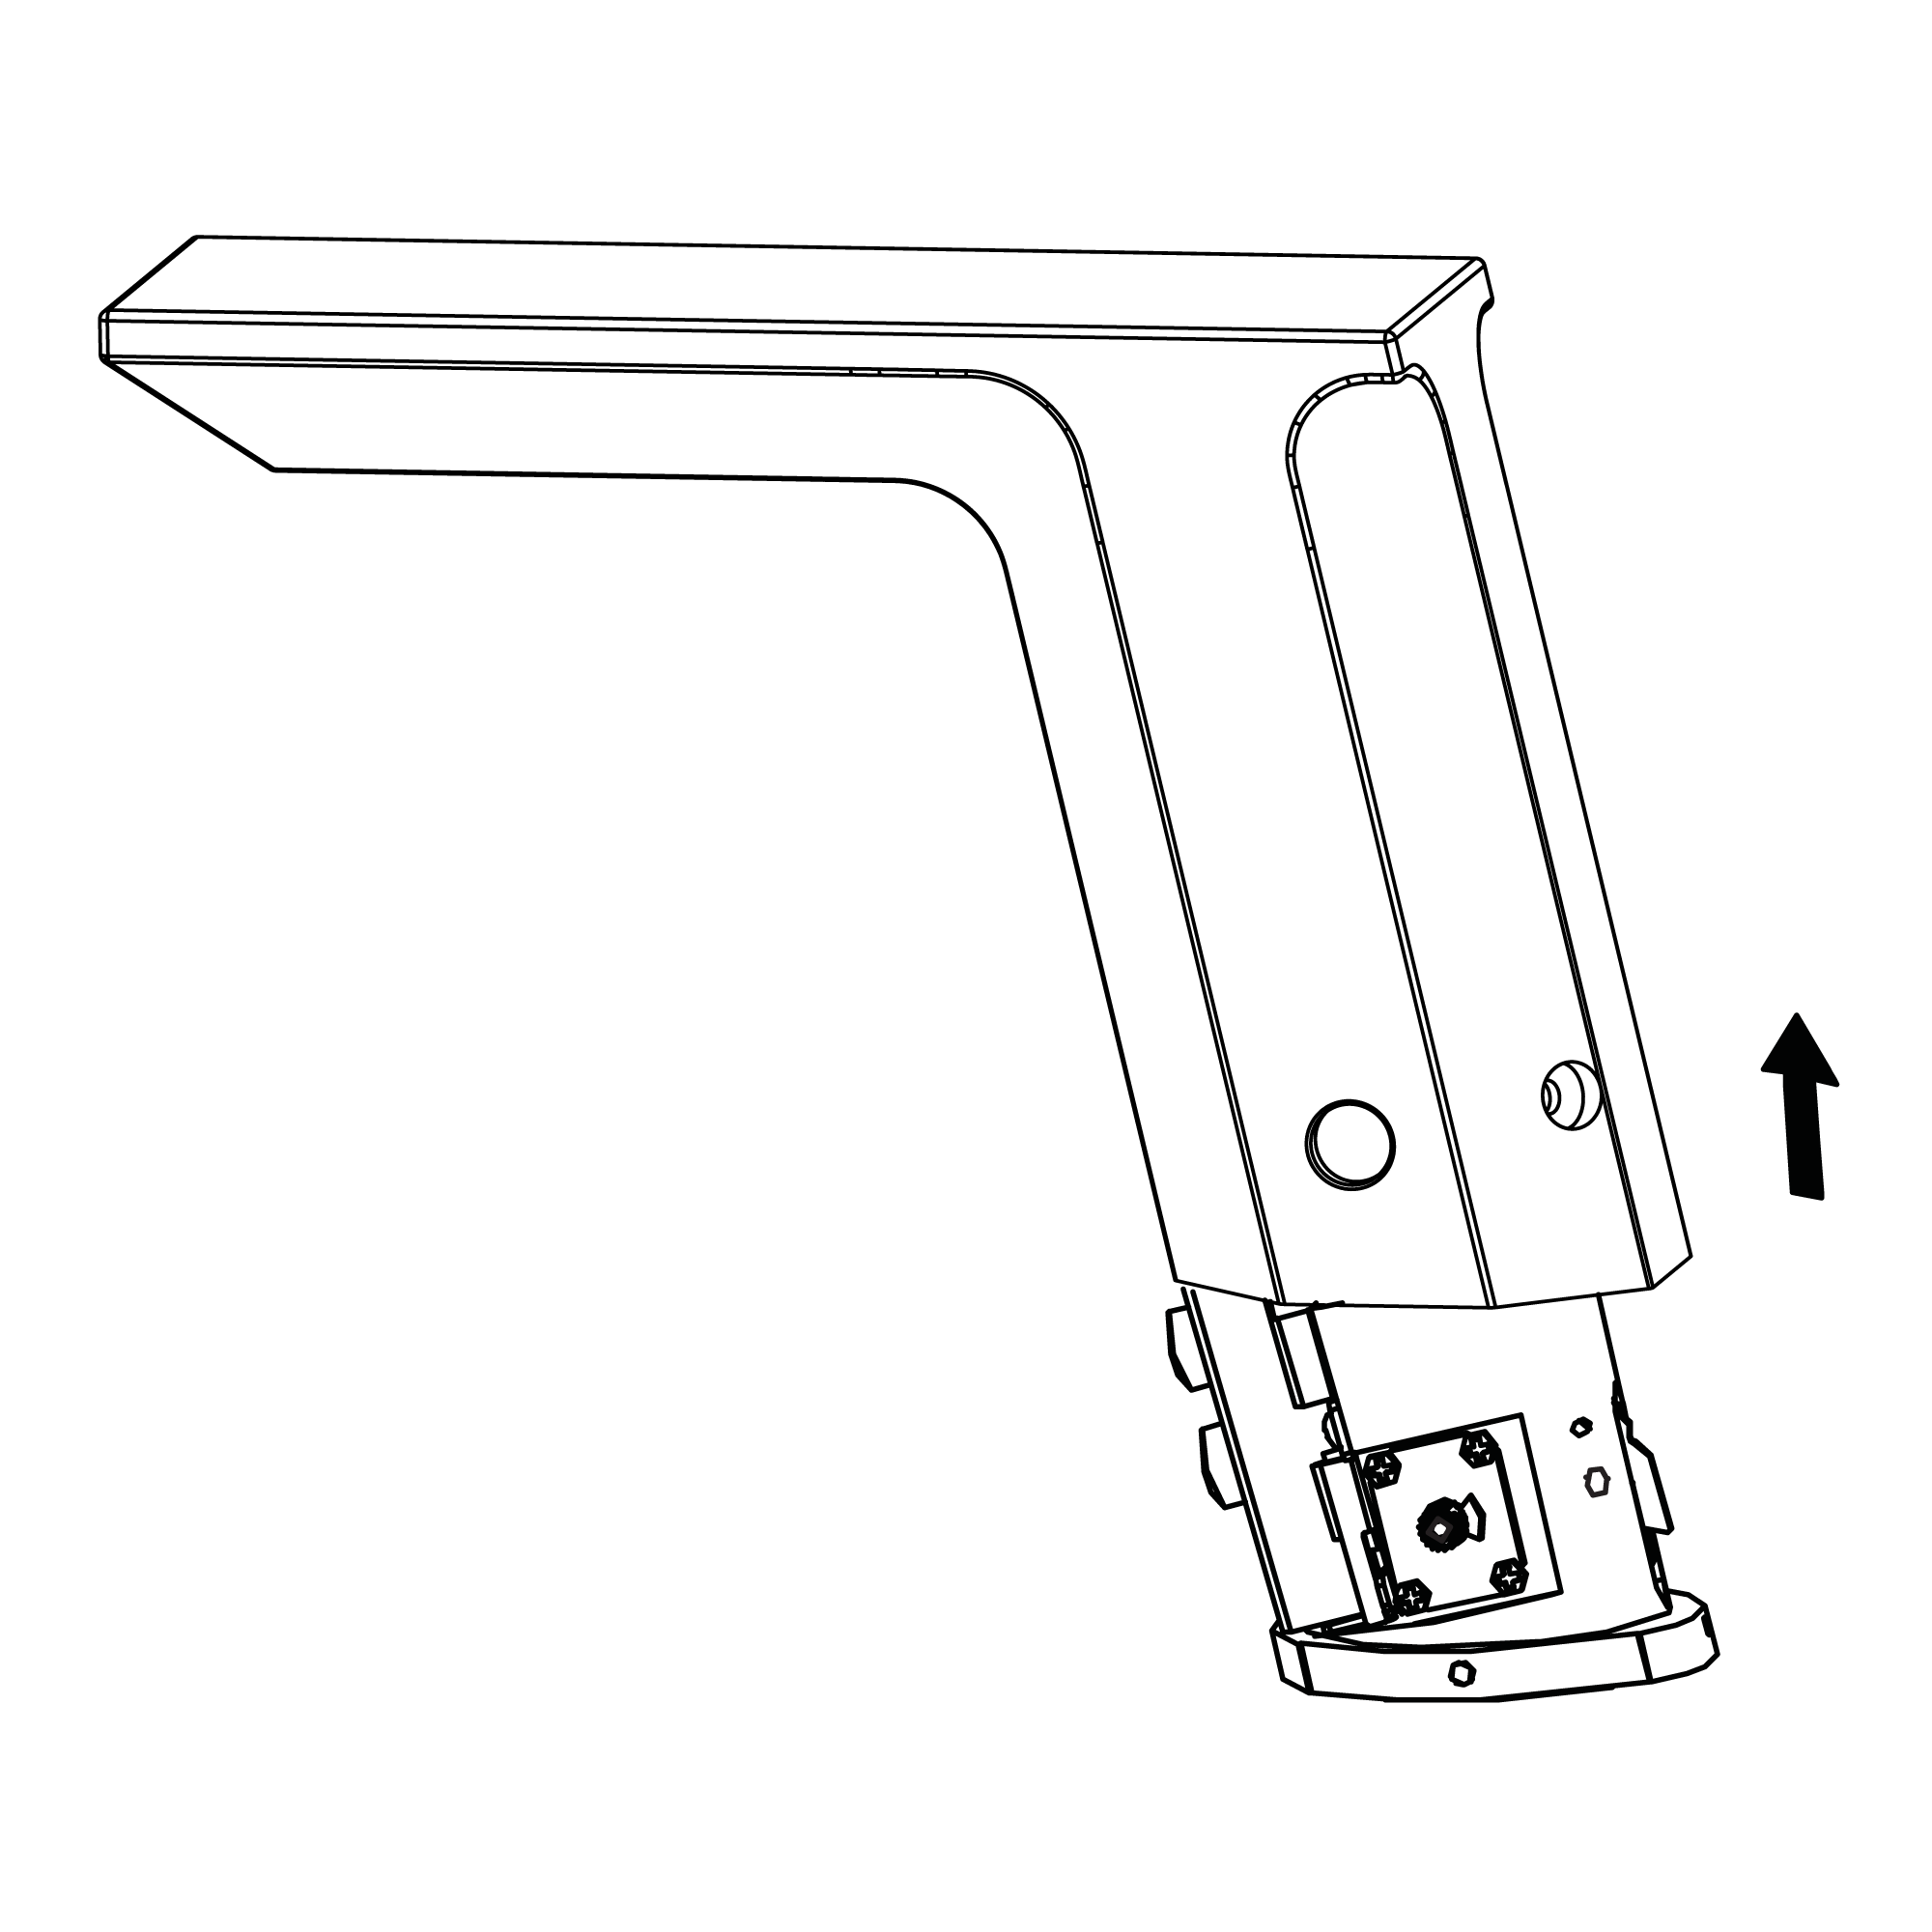
Pull the spout up gently about 6mm. A label (23) will be seen on the valve body when feel blocked. Move the spout forwards about 4mm as the label shown.
Pull the spout out gently.
Note: Do not pull or insert the spout fleetly and fiercely, otherwise the electronic control box and other parts may be damaged.
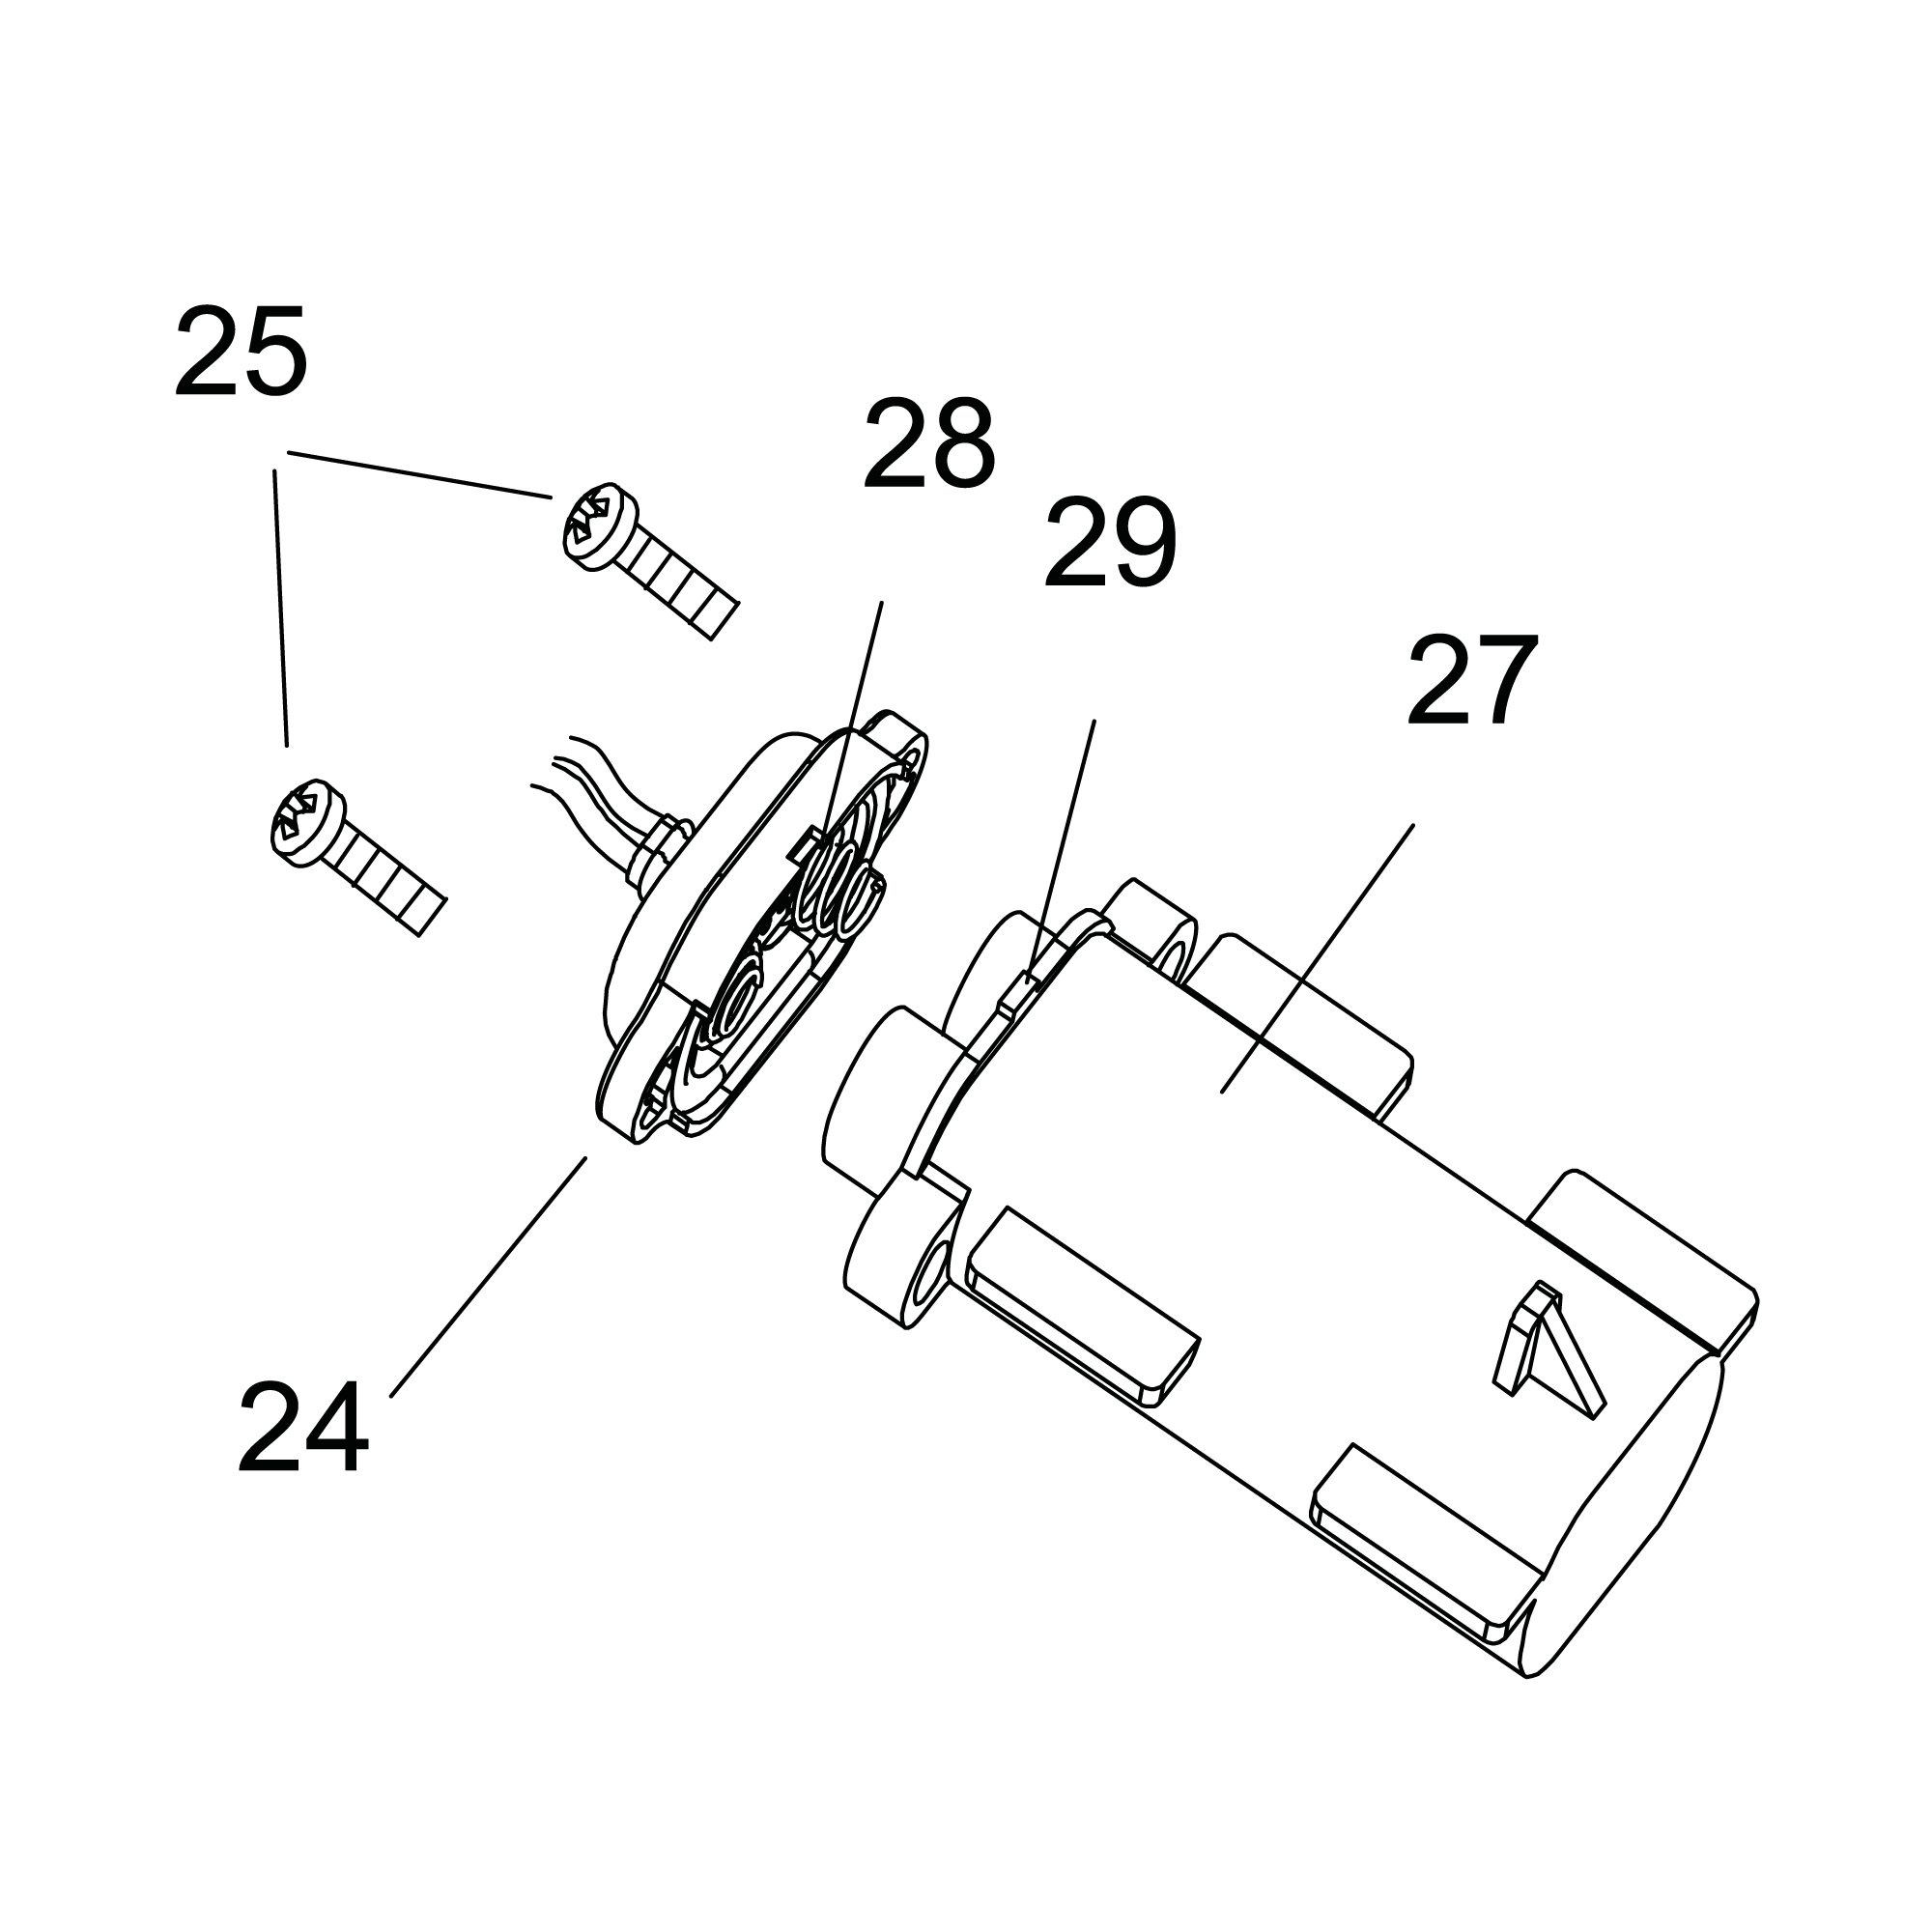
3. Remove the screws (25) on the cover (24) of battery box with a cross-screwdriver. Remove the cover of battery box. Insert 2 pieces of LR03 size alkaline batteries (26) into the battery box according to the pole indication on the cover (24).
4. Be sure the o-ring in the cover(24) of the battery box is located in the groove, put the cover (24) on the battery box (27) and tighten the screws (25).
Note: Put the bulge (29) on the battery box (27) into the gap (28) on the cover (24). Tighten the screws (25) on the battery box (27) in order to resist water.
5. Insert the spout to the valve body of the faucet (30) gently.
Move the spout backwards, and put the bulge (32) of the control box into the sensor window when the distance between the bottom of the spout and the valve body is about 6mm.
Finally, push the spout down completely.
6. Aline the hole on the back of spout to the screw hole on the bottom of the valve body. Insert the screw (22) and tighten it clockwise with the hex wrench(21). Note: Following steps are needed for temperature adjustment faucet.
7. Insert the temp adjustment handle (18) to the handle hole in accordance with the direction as the figure shown, then rotate the temp adjustment handle counterclockwise until it can not be rotated any more and take it out.
8. Insert the temp adjustment handle (18) to the handle hole in accordance with the direction as the figure shown. Insert the screw (20) along with the spring washer (19). Tighten clockwise the screw with the hex wrench (21).
Note: After installing or replacing batteries, the faucet will be in the period of automatic adjusting sensing distance( about 10 minutes). The faucet will not work during this period.
9. Replace batteries: If the indicator flashes every 2 seconds, the batteries are out of power. The faucet will not work. Replace batteries per the steps 1~8 above.
| | |
| | |
| | | | Size 1: Deck Mount Installation | | Step 2: | 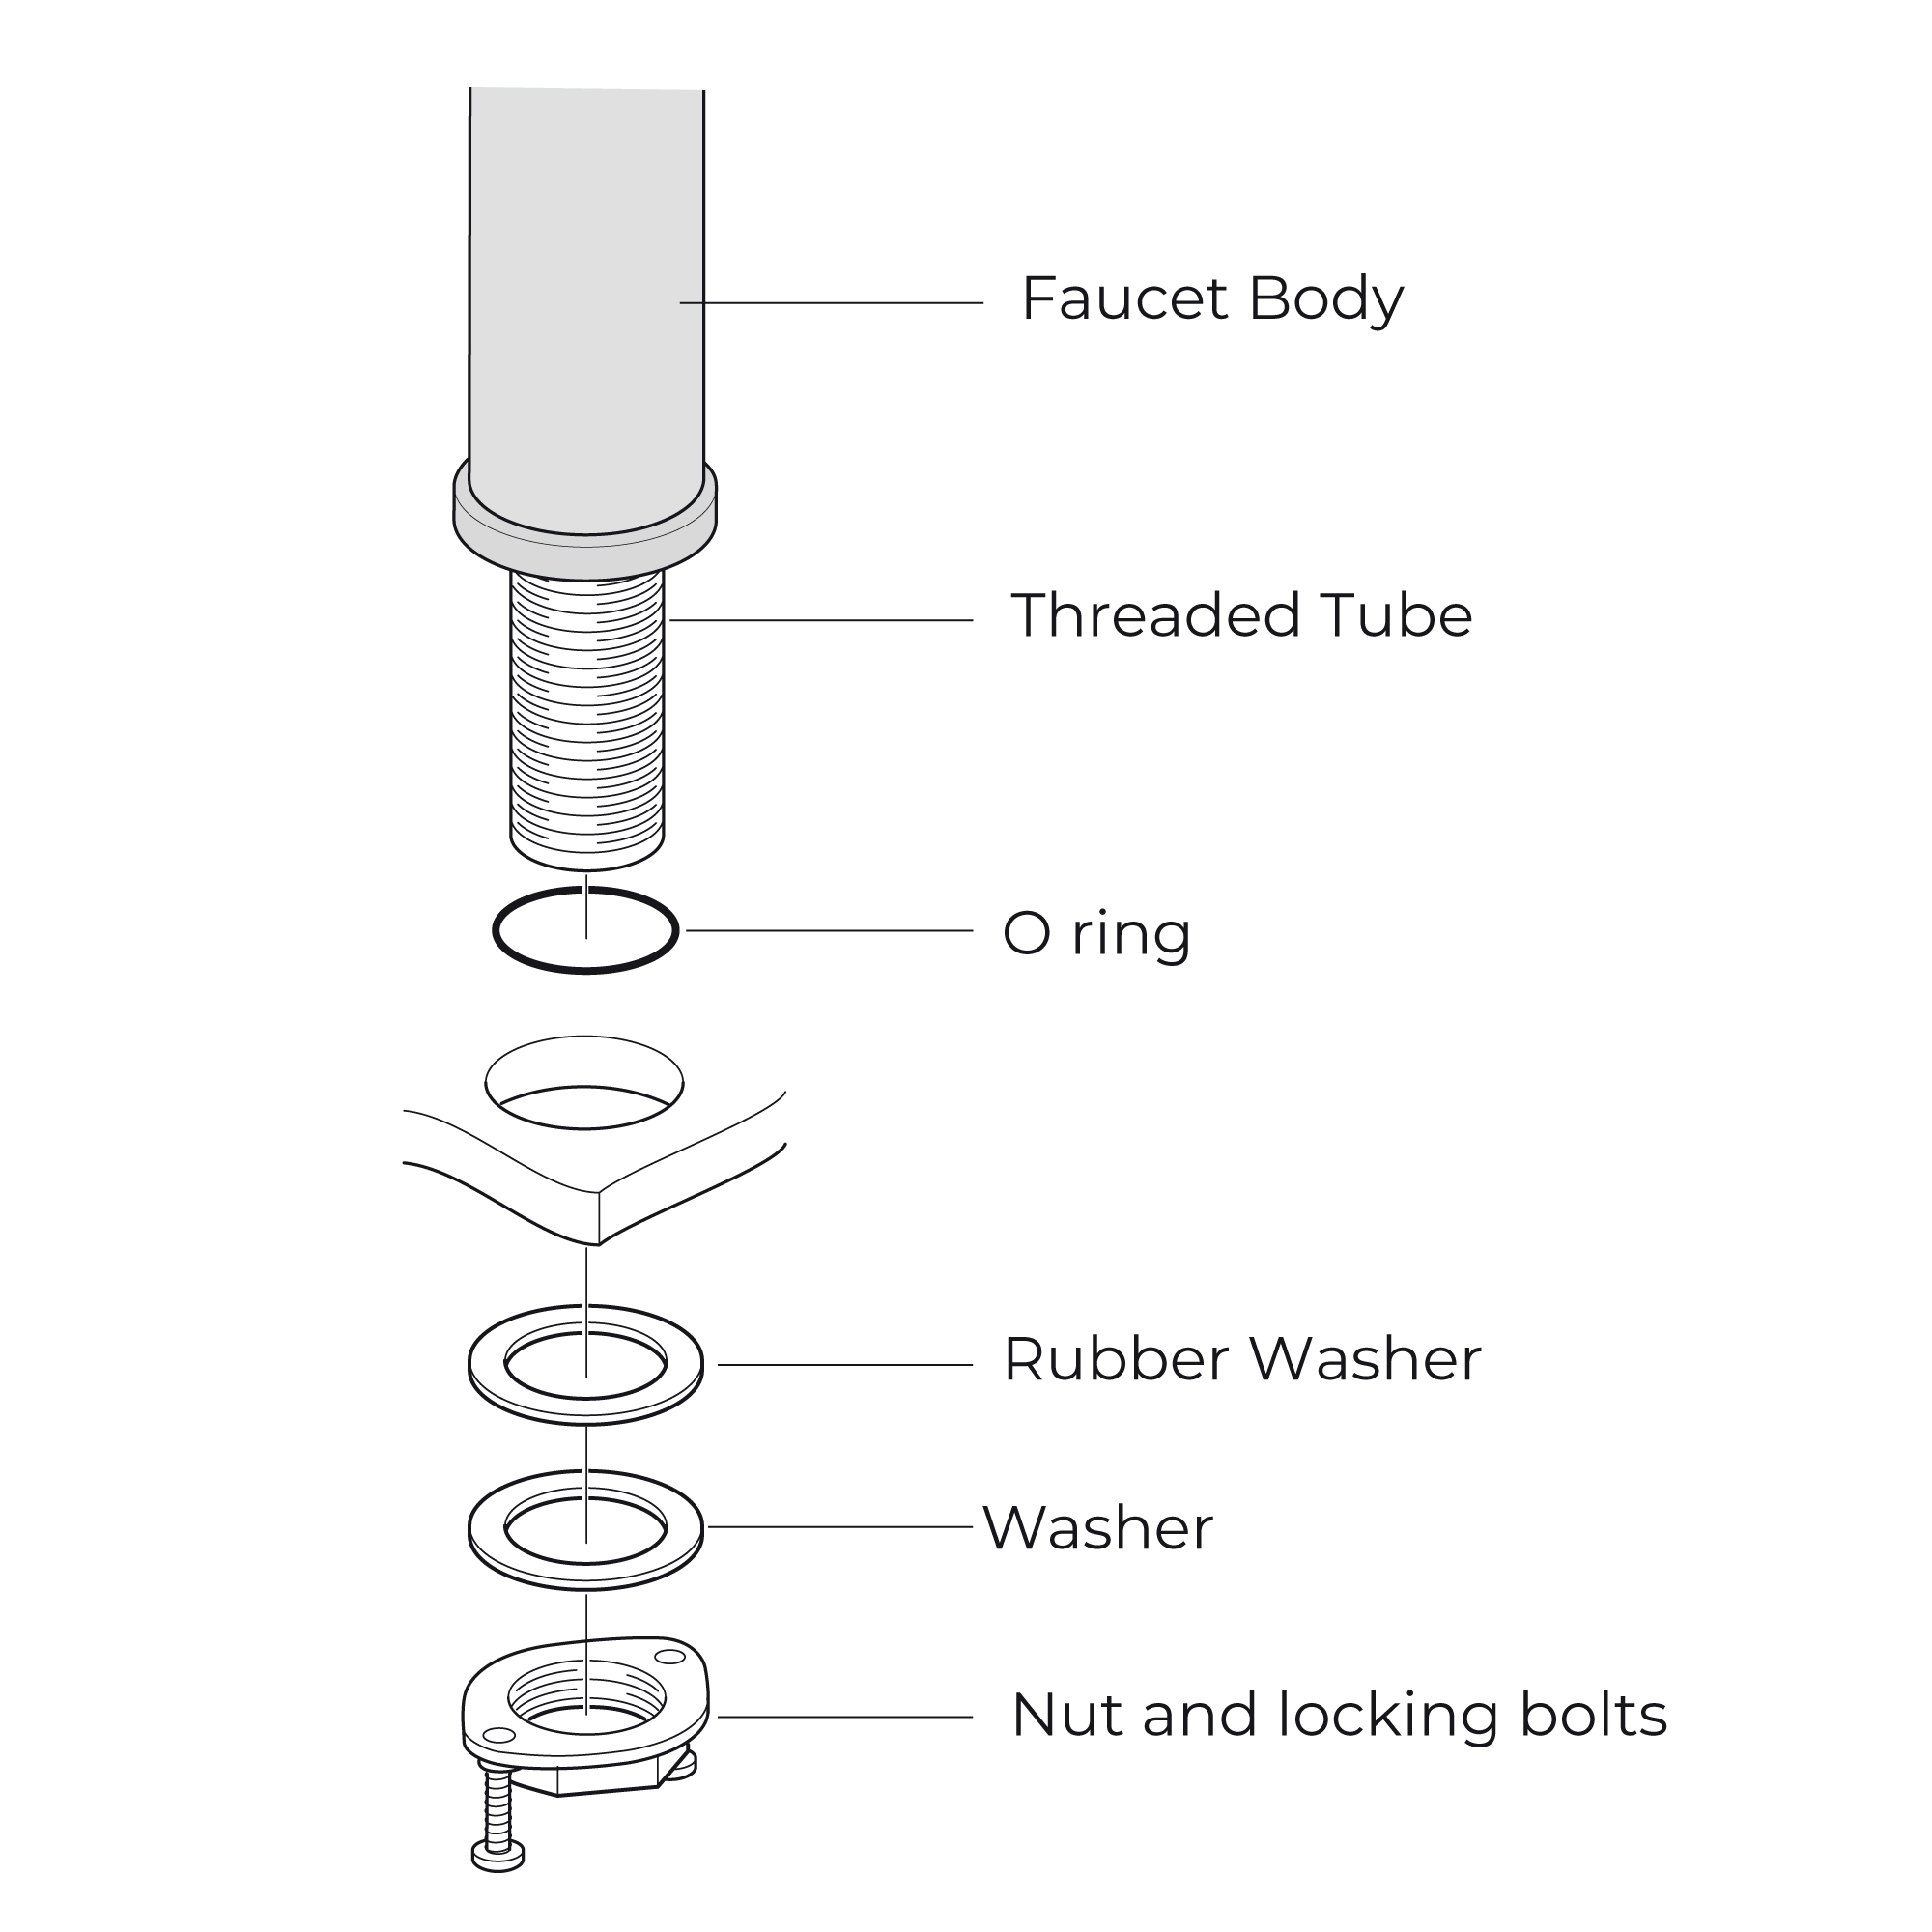
| sensor | 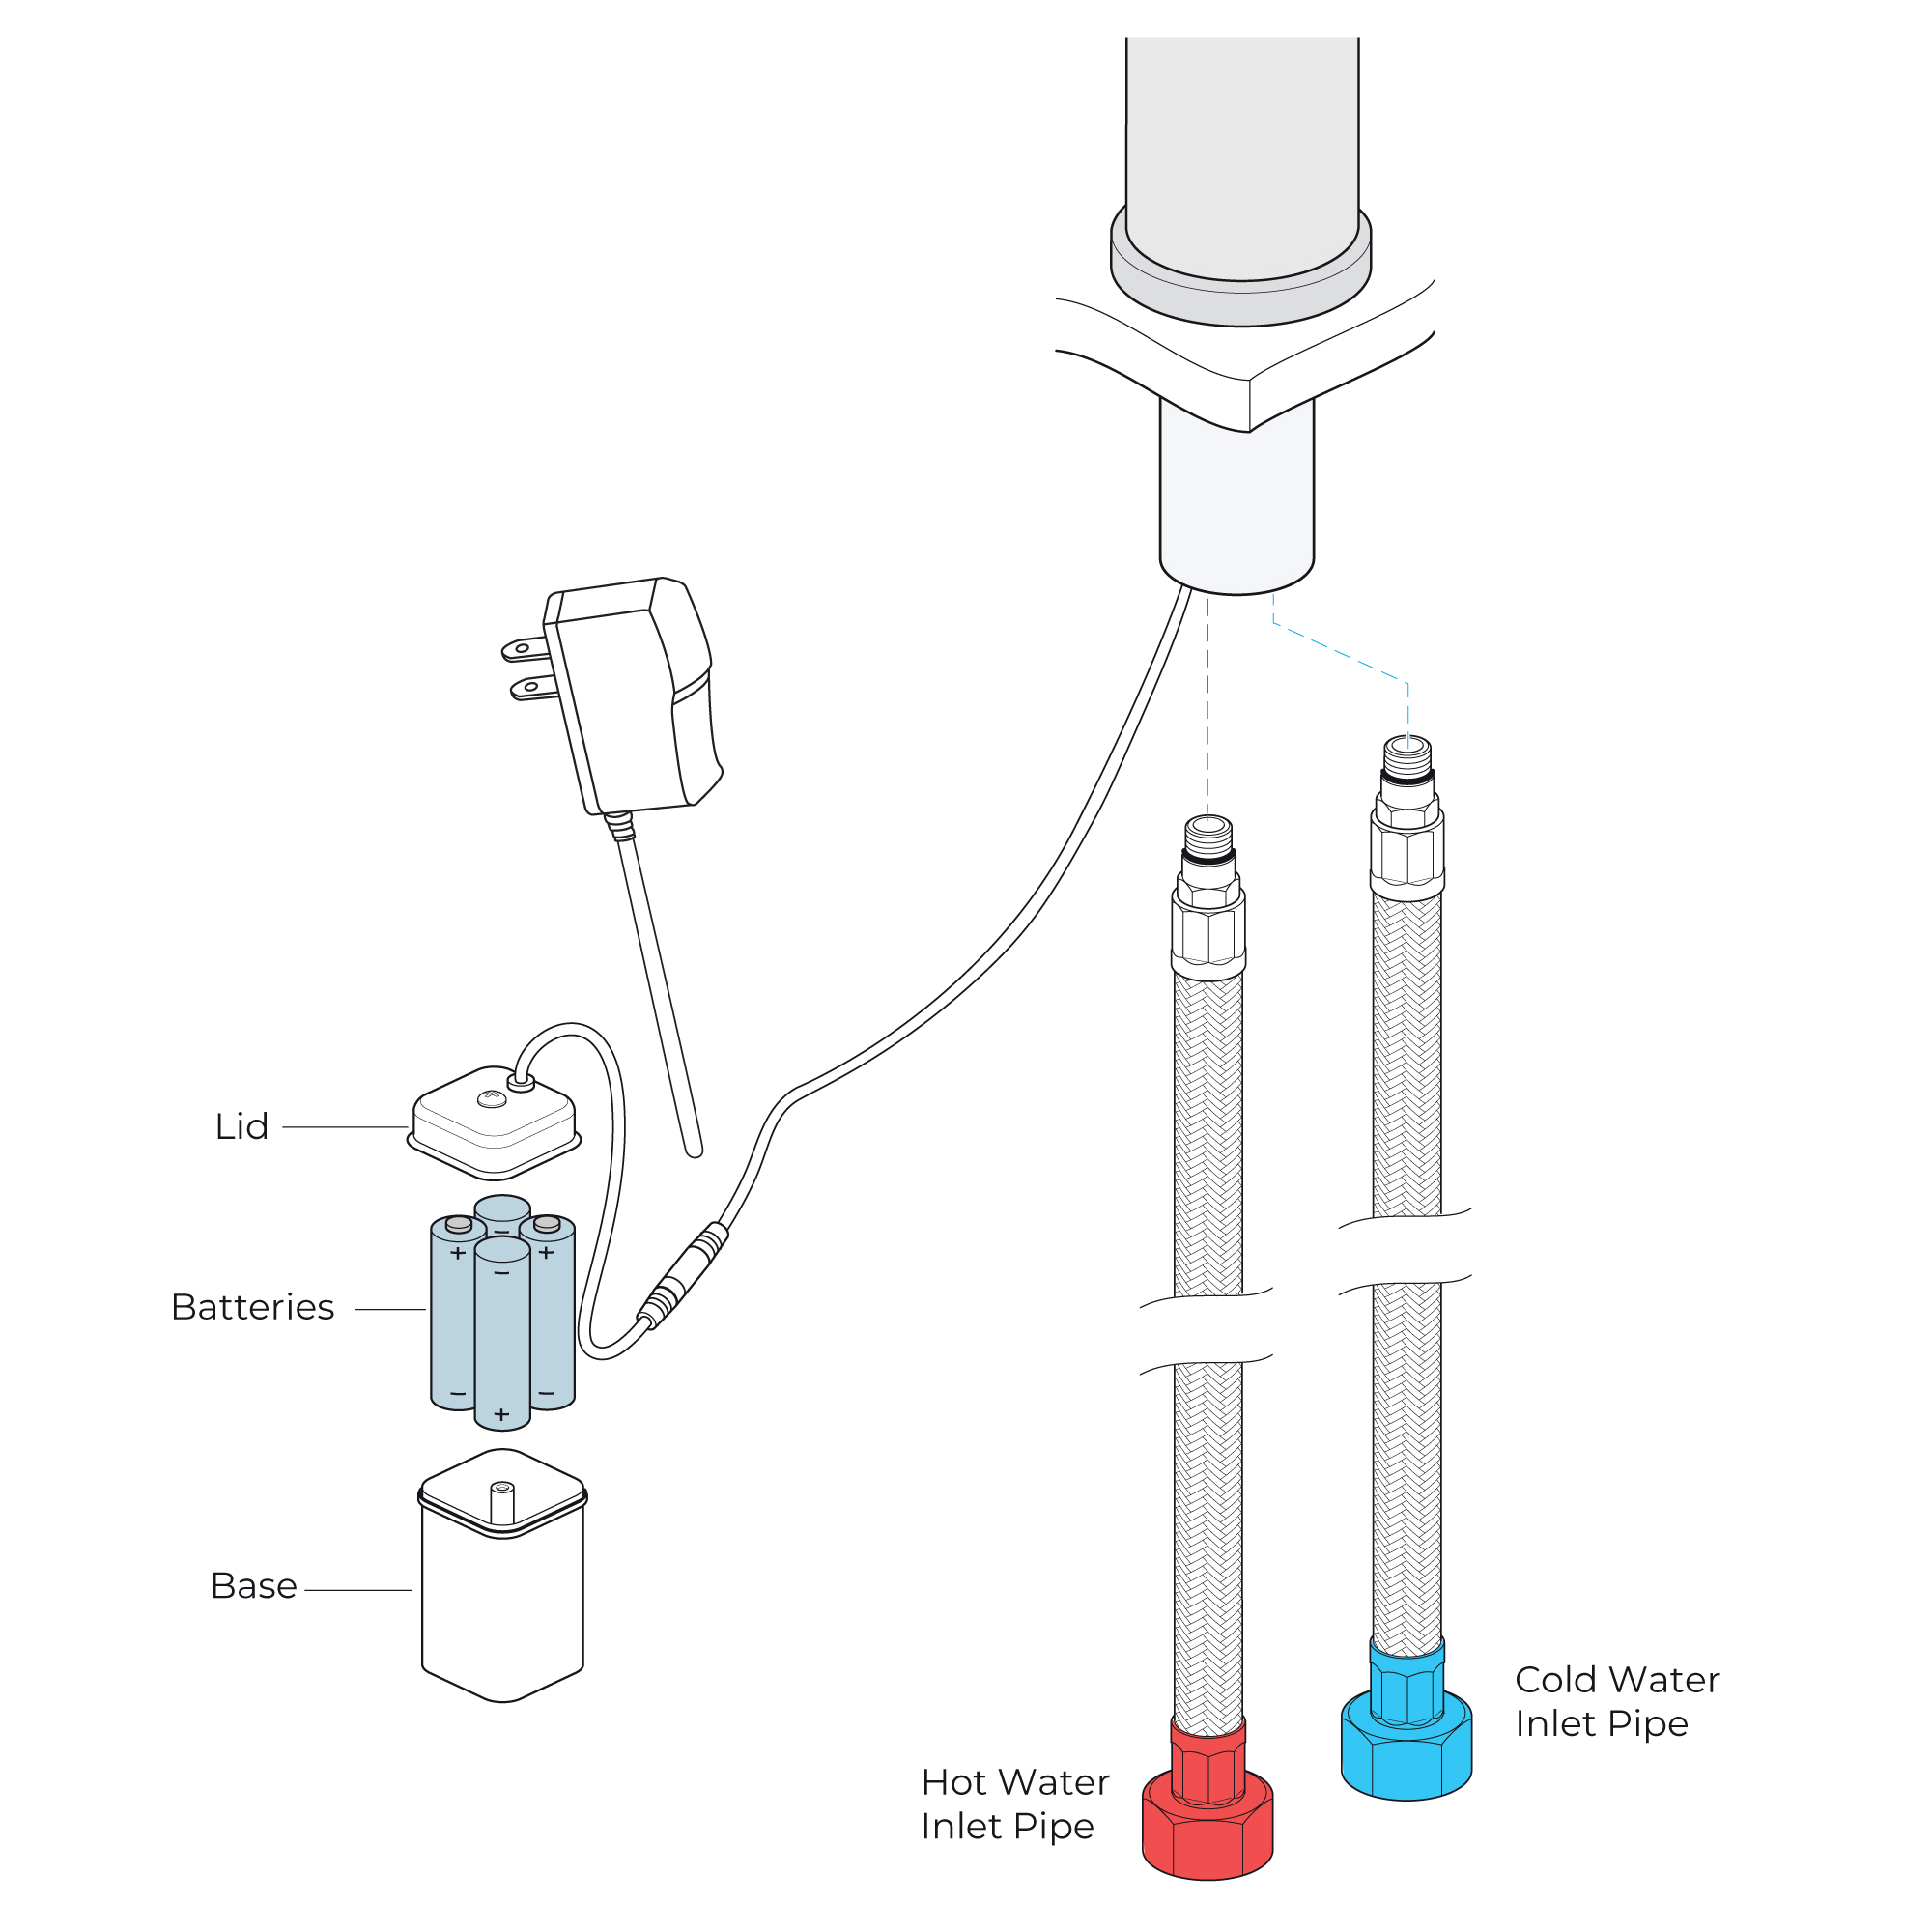
|
| | | | Step 3: Connect to Power Supply | | Step 4: | 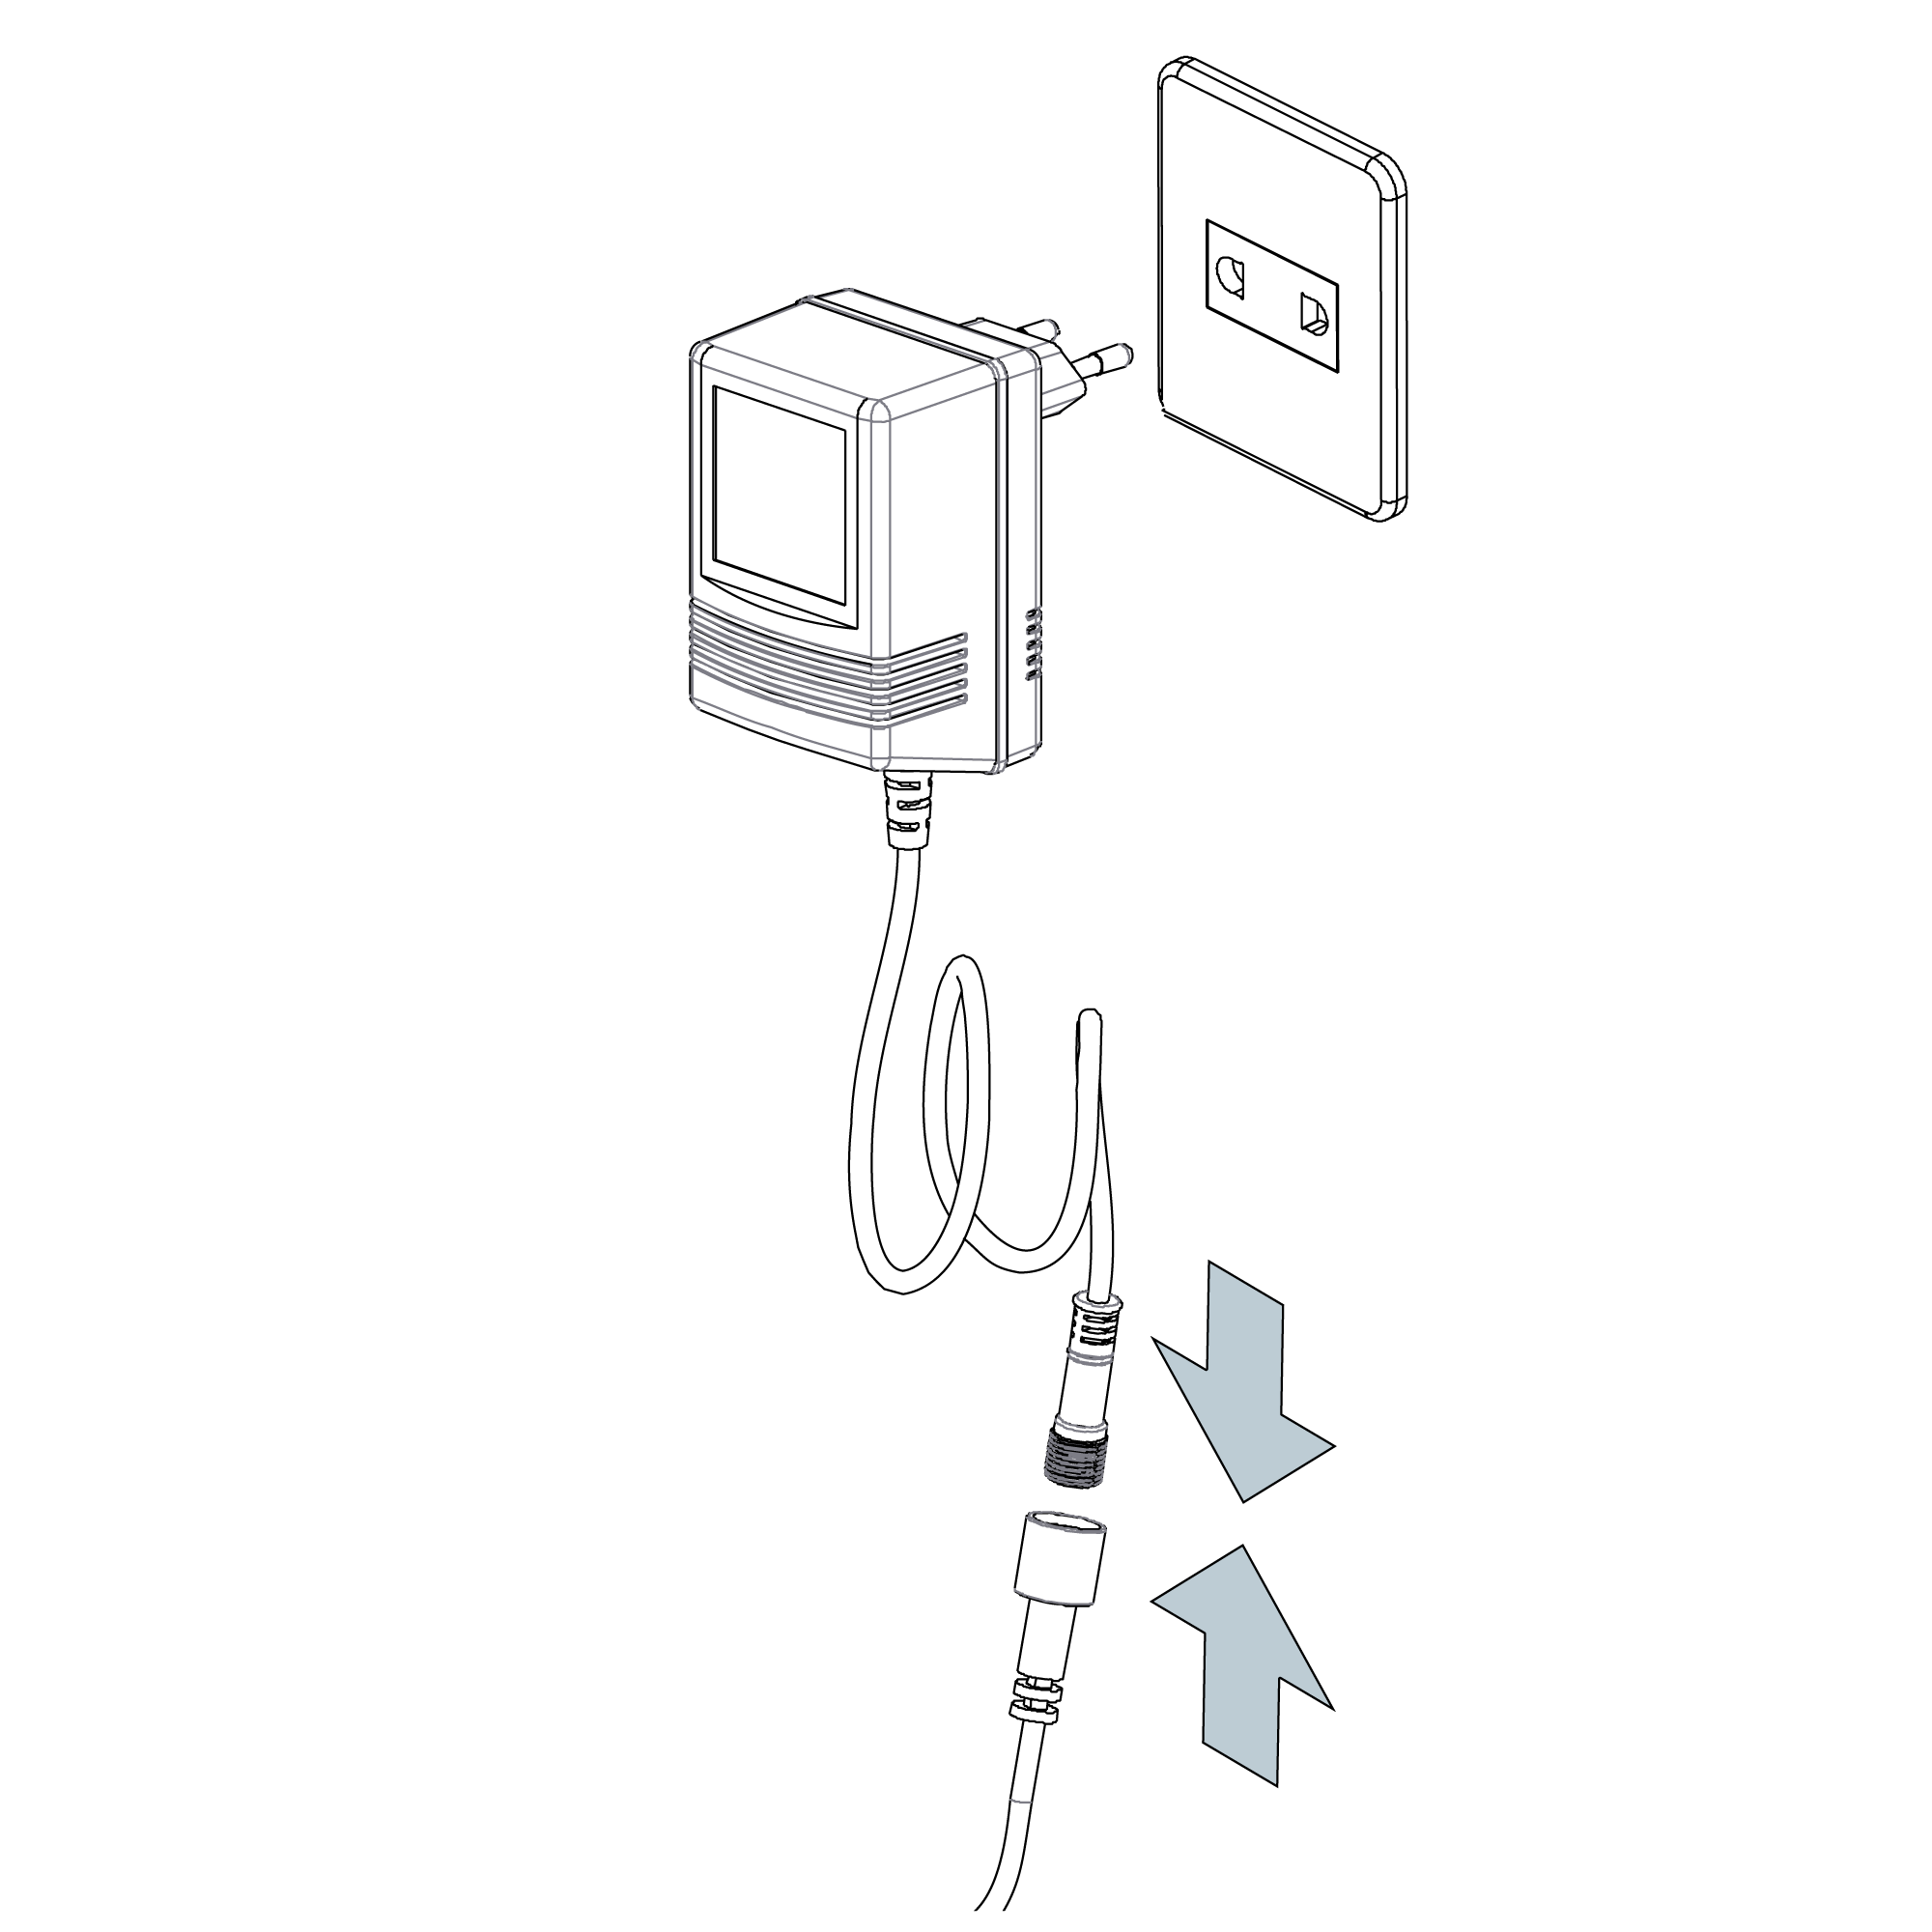
| | 
|
| |
| | Step 5: | | Step 6: (Correct way for Hose) | 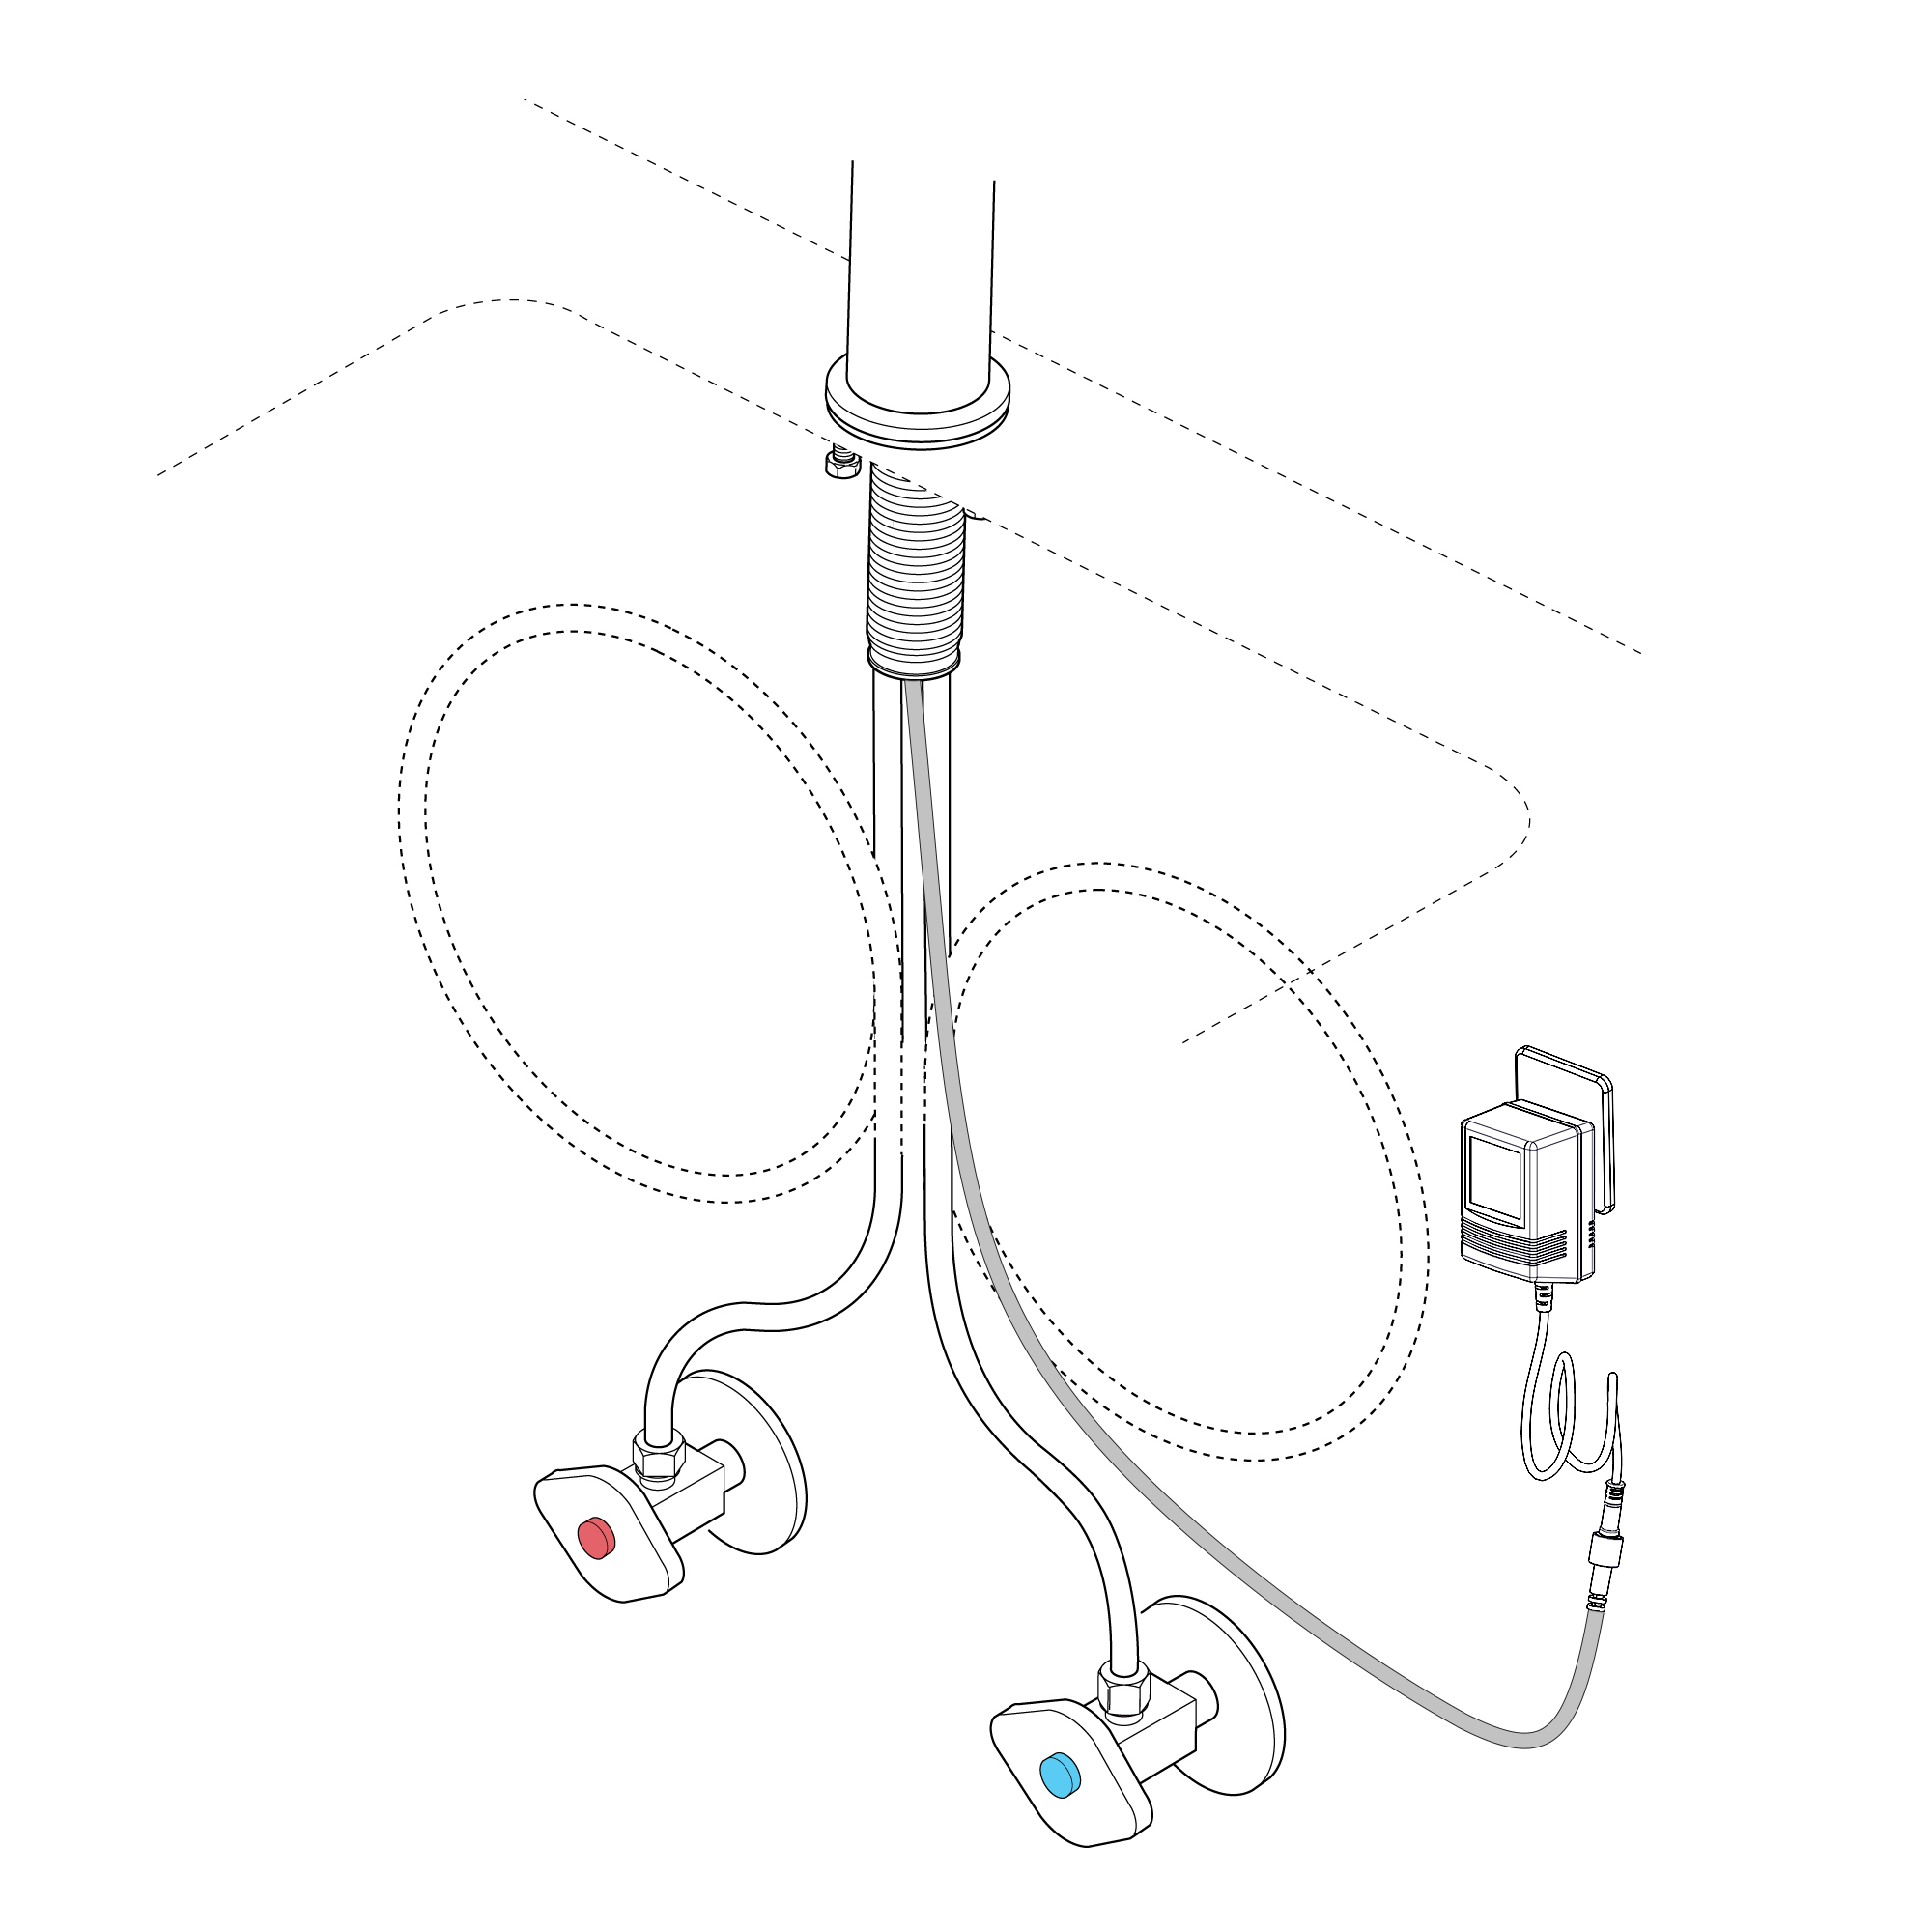
| |
|
| |
|
| | | | | |
Before installing your new mixer, flush through the pipework to ensure removal of debris, turn off the water supply.
Ensure the O ring is in place at the bottom of the mixer body.
Push the control cable down through the hole and position the mixer on the basin. From the underside of the basin fit the rubber washer, metal washer onto the threaded tube followed by the nut. Tighten the nut to clamp the mixer to the basin. Tighten the 2 side screws up onto the washer.
CAUTION: Do not over tighten the nut/bolts as this may damage the basin.
Screw the two flexible pipes to the mixer body, but do not over tighten, hand tighten only.
Connect the water supply to the inlet pipes. The hot water should be connected to the front pipe.
Plug together the connectors coming from the mixer to the transformer. Line up the flats on both the plug and socket and firmly push together.
| | |
Flexible Connecting Hose
Care must be taken when connecting the flexible connection hose from the power supply box to the spout to ensure it does not bend sharply and kink or twist.
See above for recommended ways to fit the flexible connecting hose.
Important: Failure to follow these guidelines may result in poor performance and damage to the flexible connection hose. |
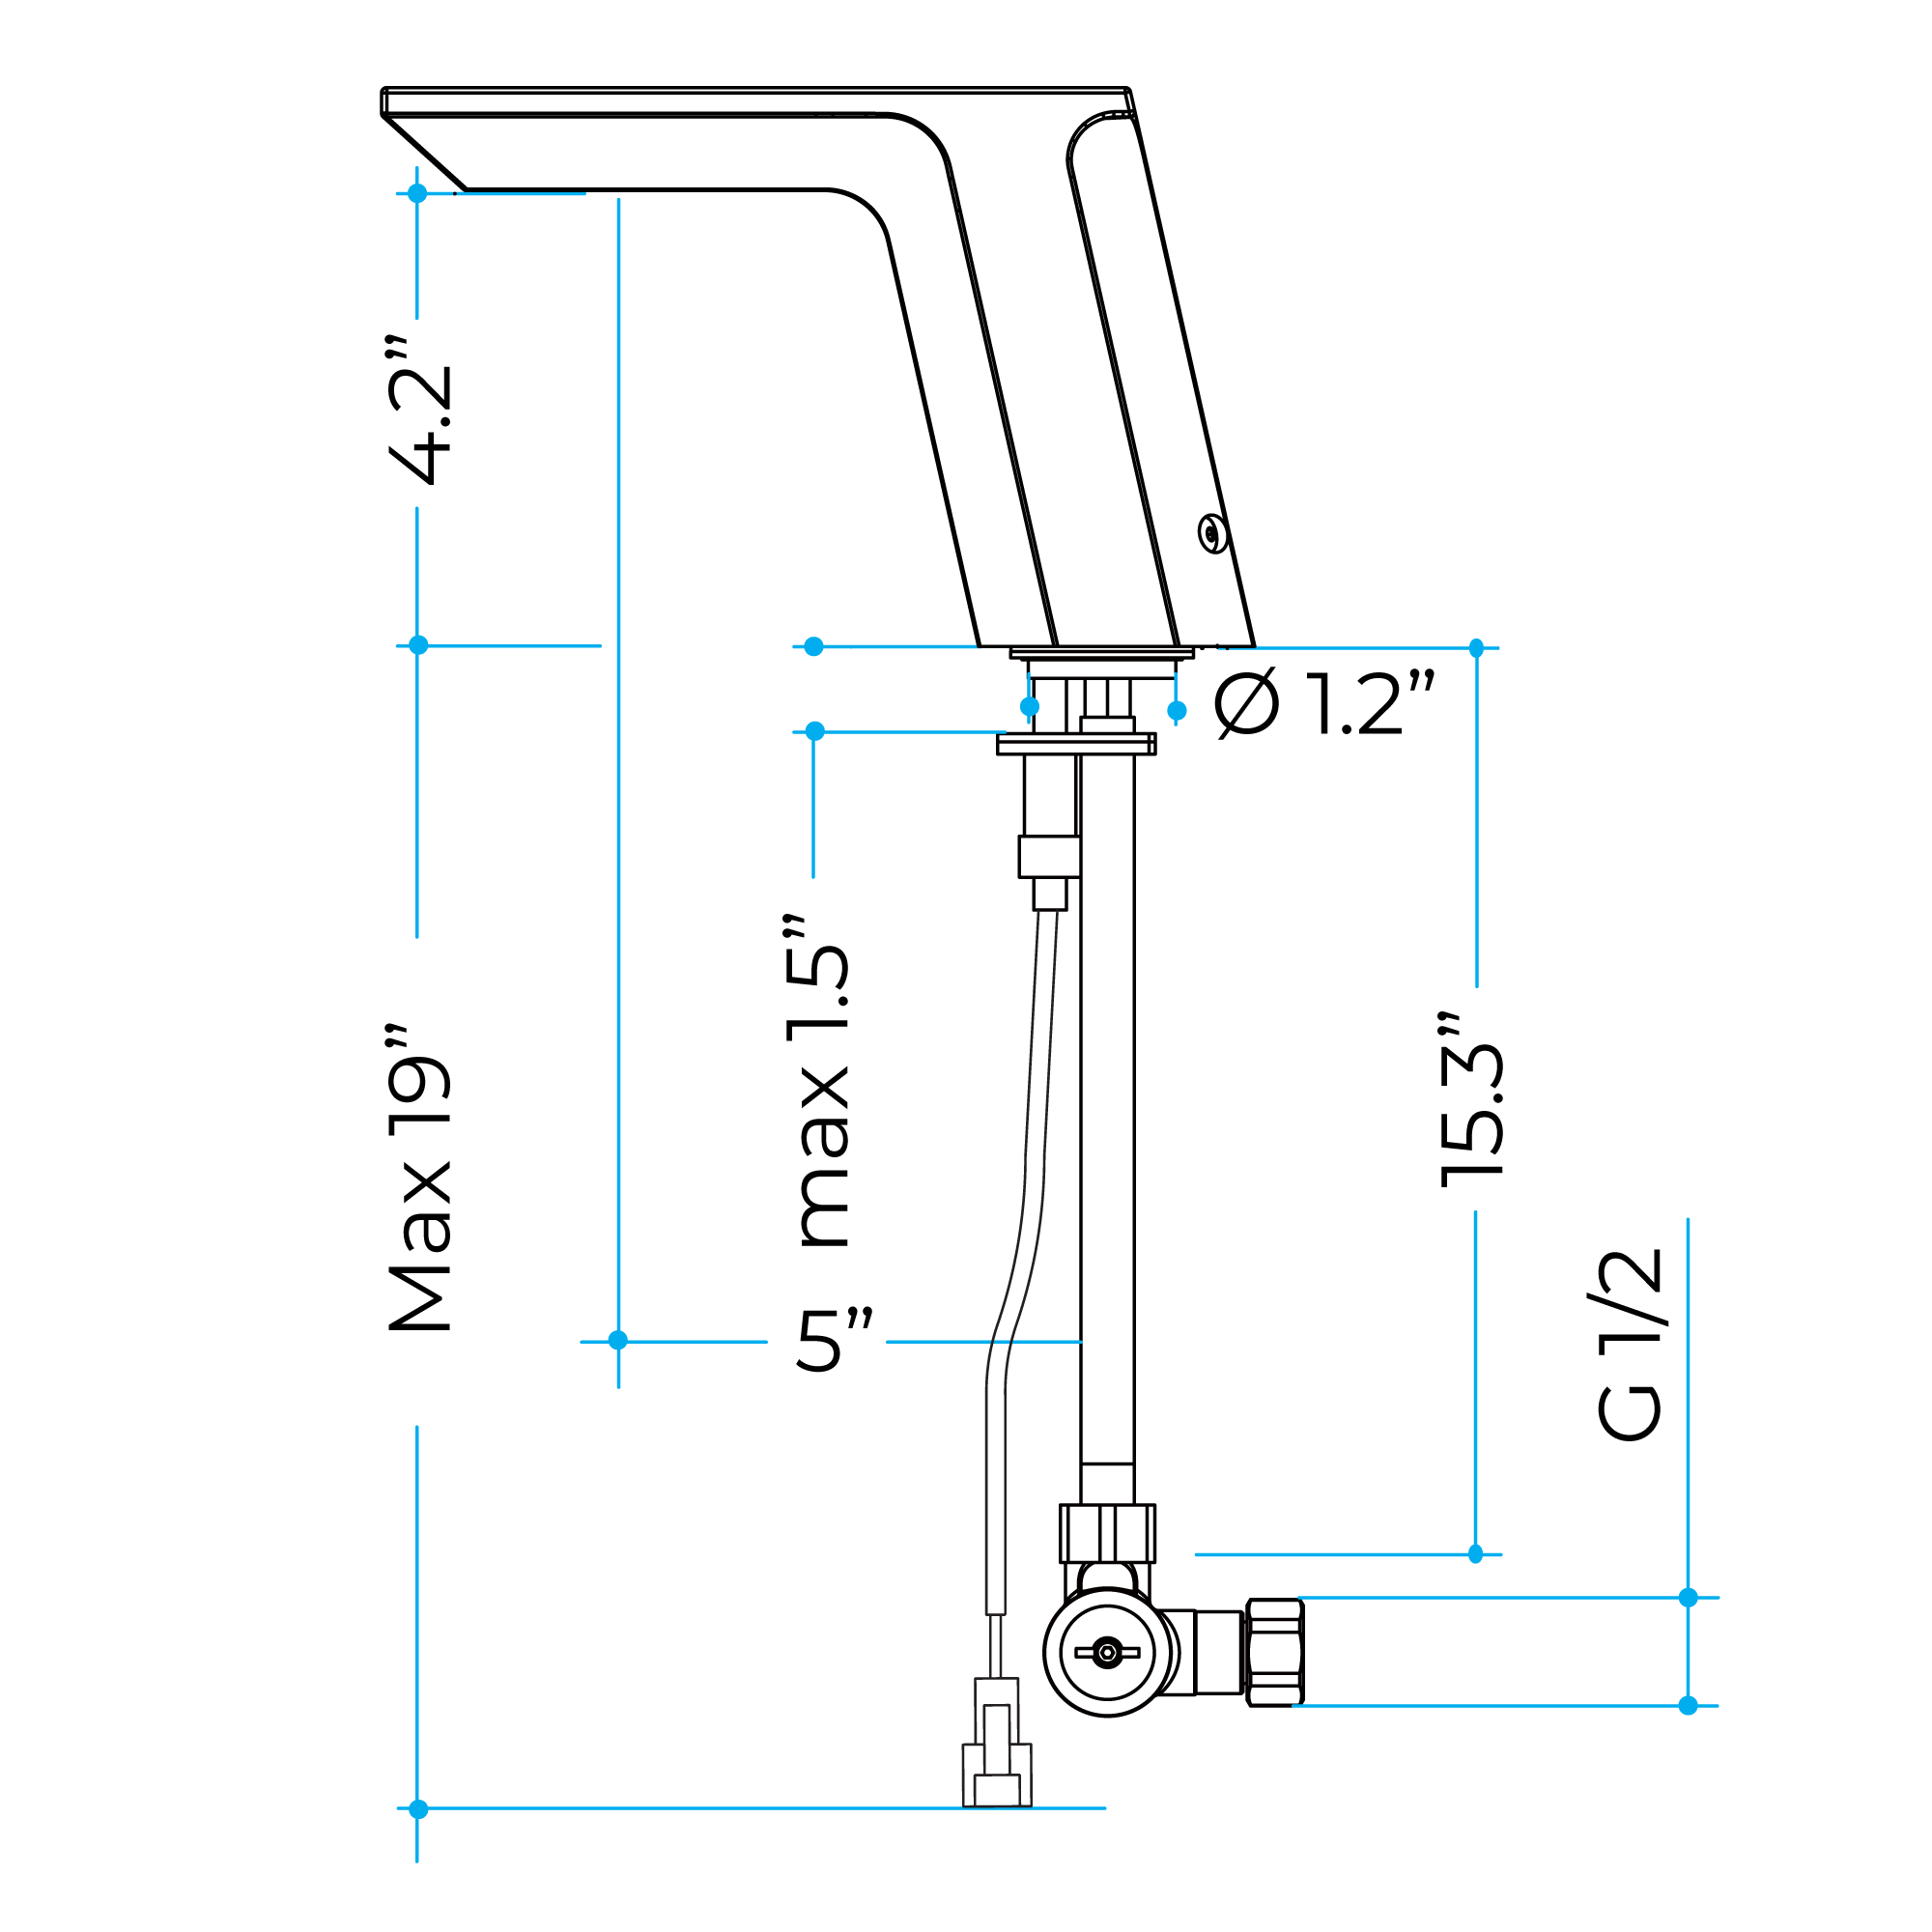
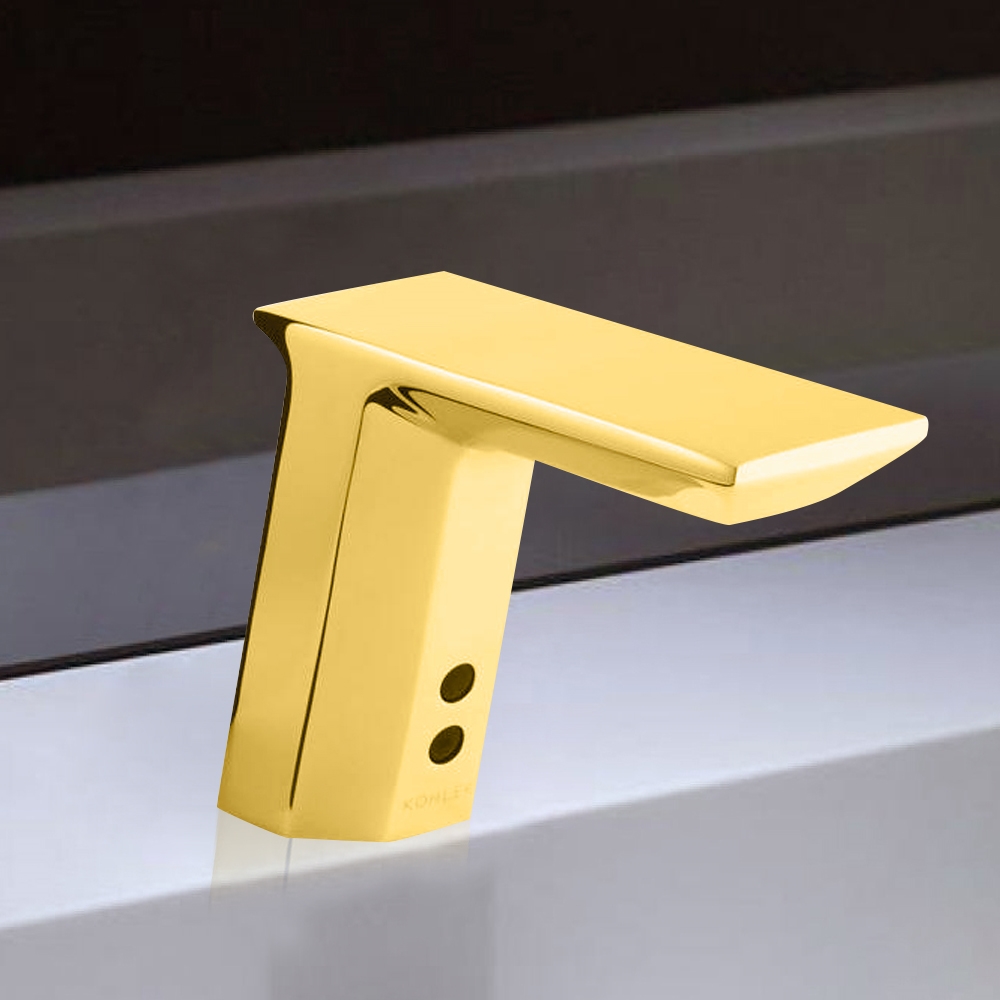
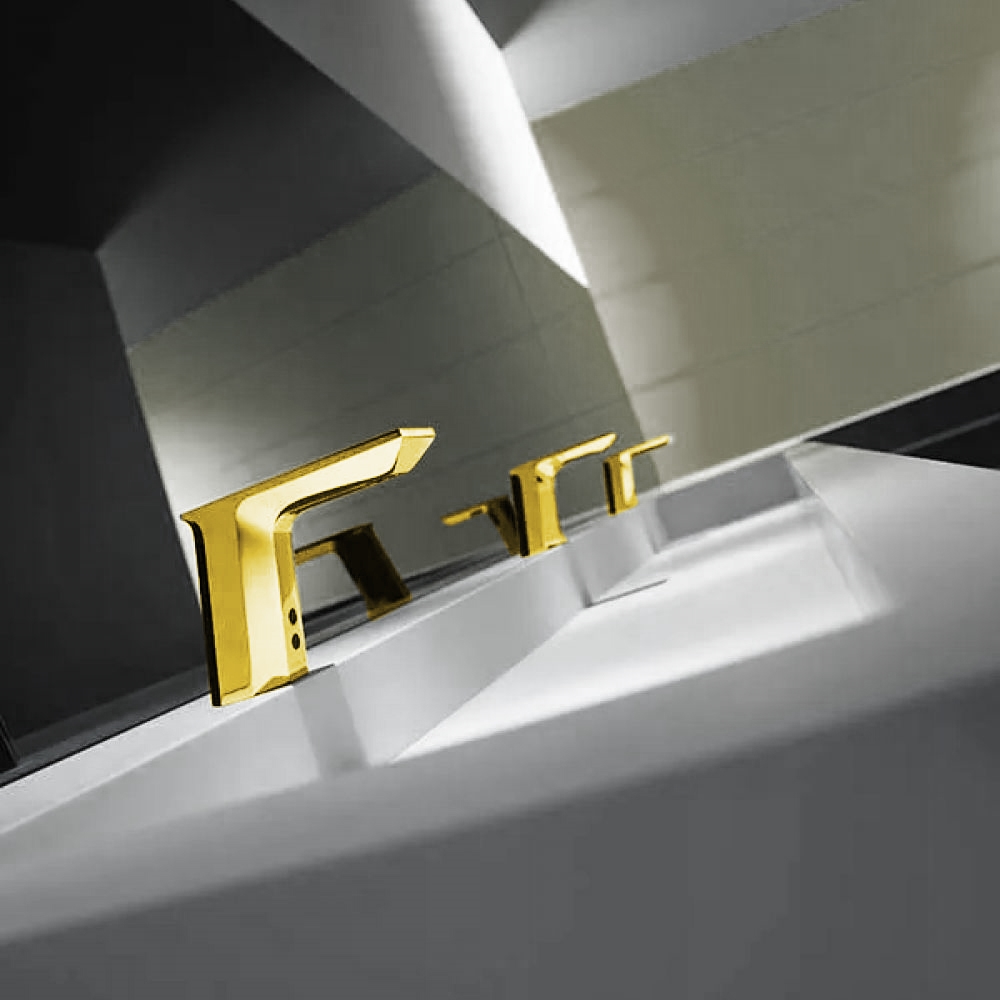
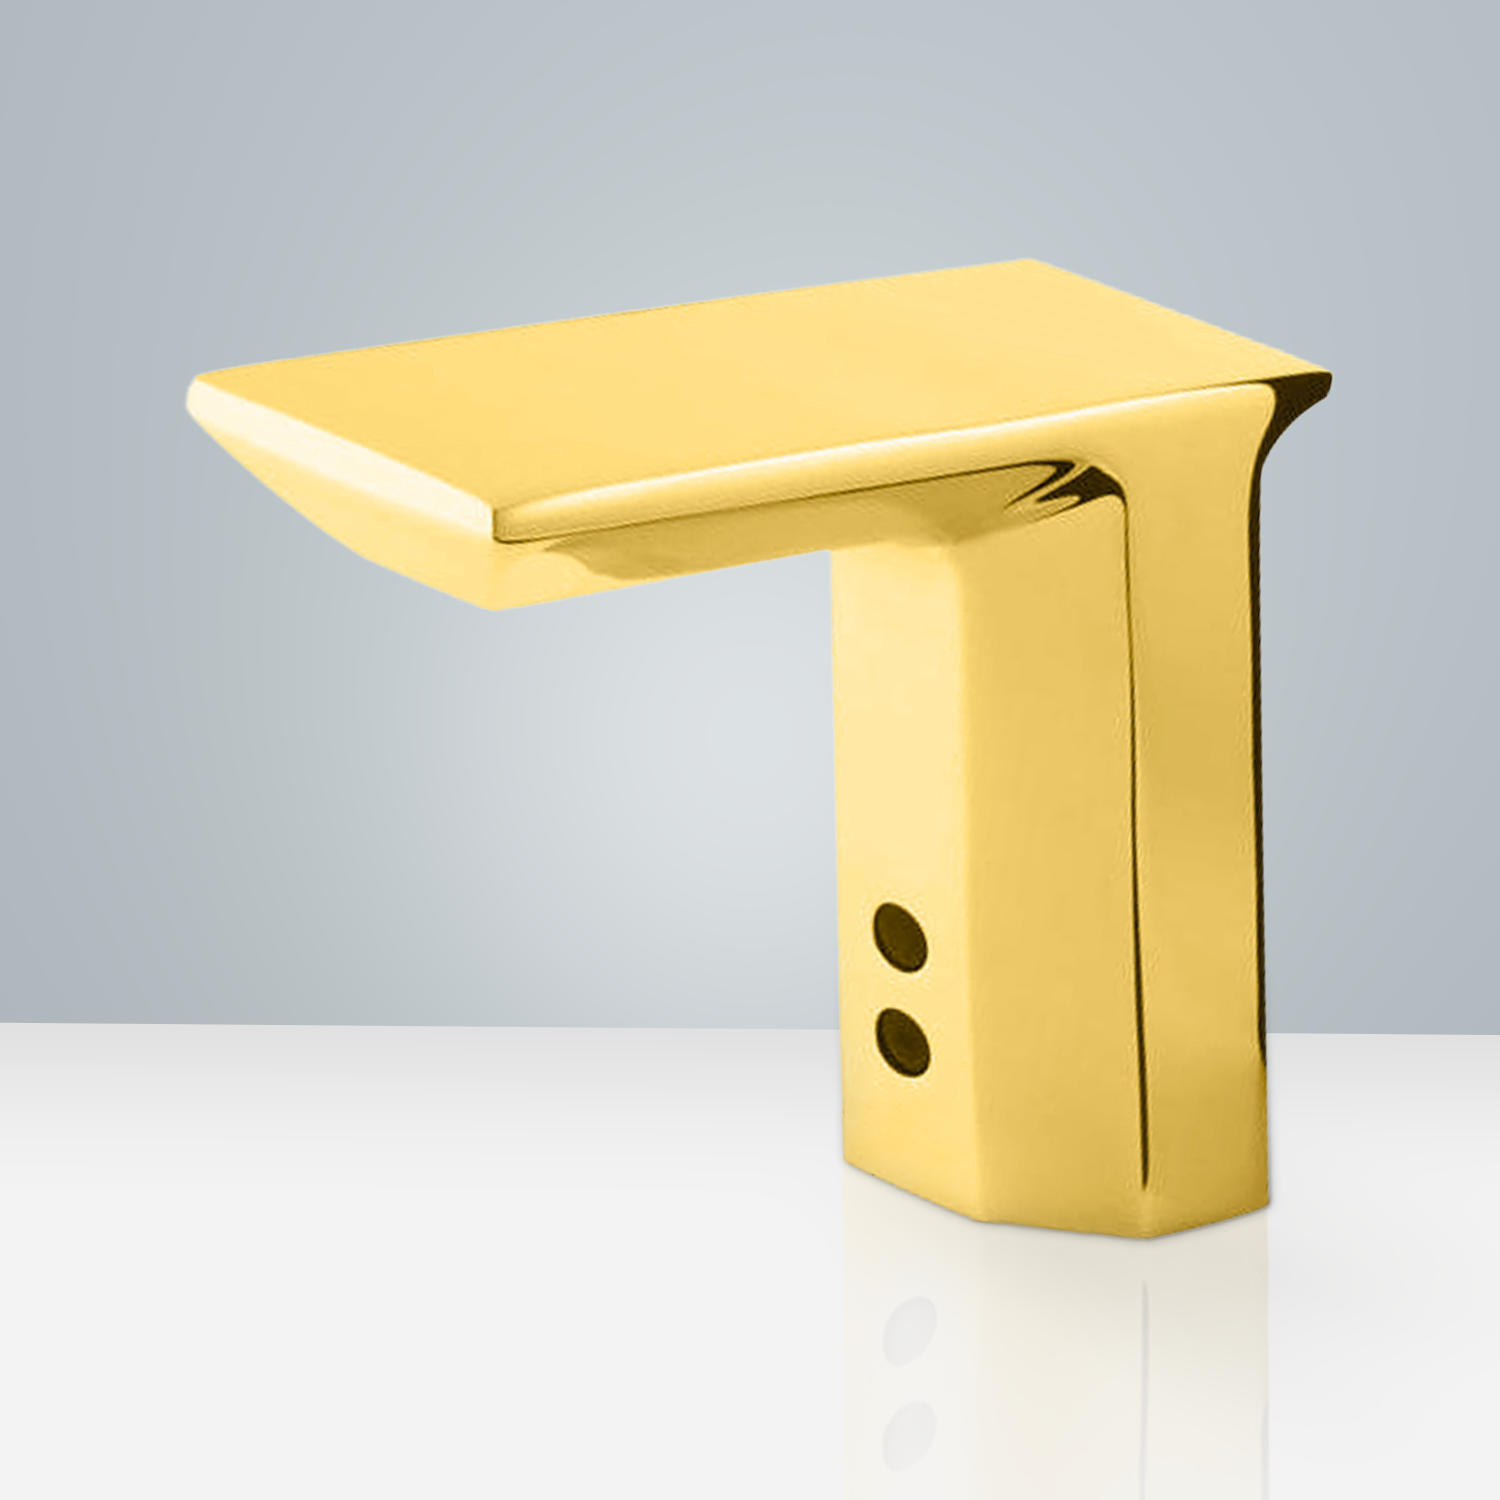
Fontana Peru Commercial Motion Sensor Activated Automatic Faucet Brass Valve Gold Finish
This motion sensor activated faucet is the perfect choice for residential as well as public places such as schools, hotels, restaurants etc. There are 3 choices of finish - Polished Chrome, ORB or Gold tone, so whatever the overall design, there will be an option that will perfectly fit in. The sensing distance and the auto shutoff time are both adjustable, making it possible to maximize the water savings by personalizing these features. Because of the standard connections and the supply of all the necessary hoses and accessories, the installation is easy. Sensitive Sensor with Infrared AI Smart-Chip. This 6.4" Spout Height Waterfall Automatic Sensor Faucet is great for homes, restaurants, hotels, schools and other public places. With Auto-switch off.
|
|

|
Features:
|
Visit Product Page |
|
- Brand Name: Fontana
- Model Number: FS-6431
- Materials: Solid Brass
- Finish: Gold
- Power: DC AA Alkaline Battery, AC/DC alternately
- Working Pressure: 0.5~7Bar
- Water Supply Pipe Size: DN15 (G1/2")
- Ambient Temp. Range: 0.1~ 55 Celsius
- Sensing Distance: Adjustable 25cm (default 25cm)
- Sensing Range Setup: Digital
- Response Time: 0.3 sec (default)
- Off Delay Time: 1 Sec (default)
- Pop-up Drain: Optional
- Fresh Battery Life Cycle: 500,000 on/off
- Power Supply: AC110V And DC6V (batteries not included)
- Low Battery Indicator: 2 Red Led flash
- Maximum Running Time: 60 Seconds
- Weakness of Battery: Red Led on
- Usage: Commercial / Residential
|
|
|
|
|